Bored with bow litter? Learn to make a DIY hair bow organizer that’s cute, simple, and good for any child’s room. A enjoyable, useful craft undertaking! Additionally you’ll be able to personalize it in minutes.
Expertise Required: Superior Newbie. You will want to know easy methods to use Mod Podge, scorching glue, and die lower vinyl to finish this craft.
Let’s discuss concerning the black gap of hair equipment.
You already know the one: that mysterious dimension the place bows, clips, and elastics go to vanish, by no means to be seen once more. You purchased a pack of 40 glitter barrettes final month. How are there solely three left—and one in all them is completely tangled within the carpet?
If this sounds acquainted, buddy, it’s time for a trendy intervention.
Enter: the DIY hair bow organizer. She’s cute, she’s useful, and she’s right here to avoid wasting your morning routine (and your sanity).
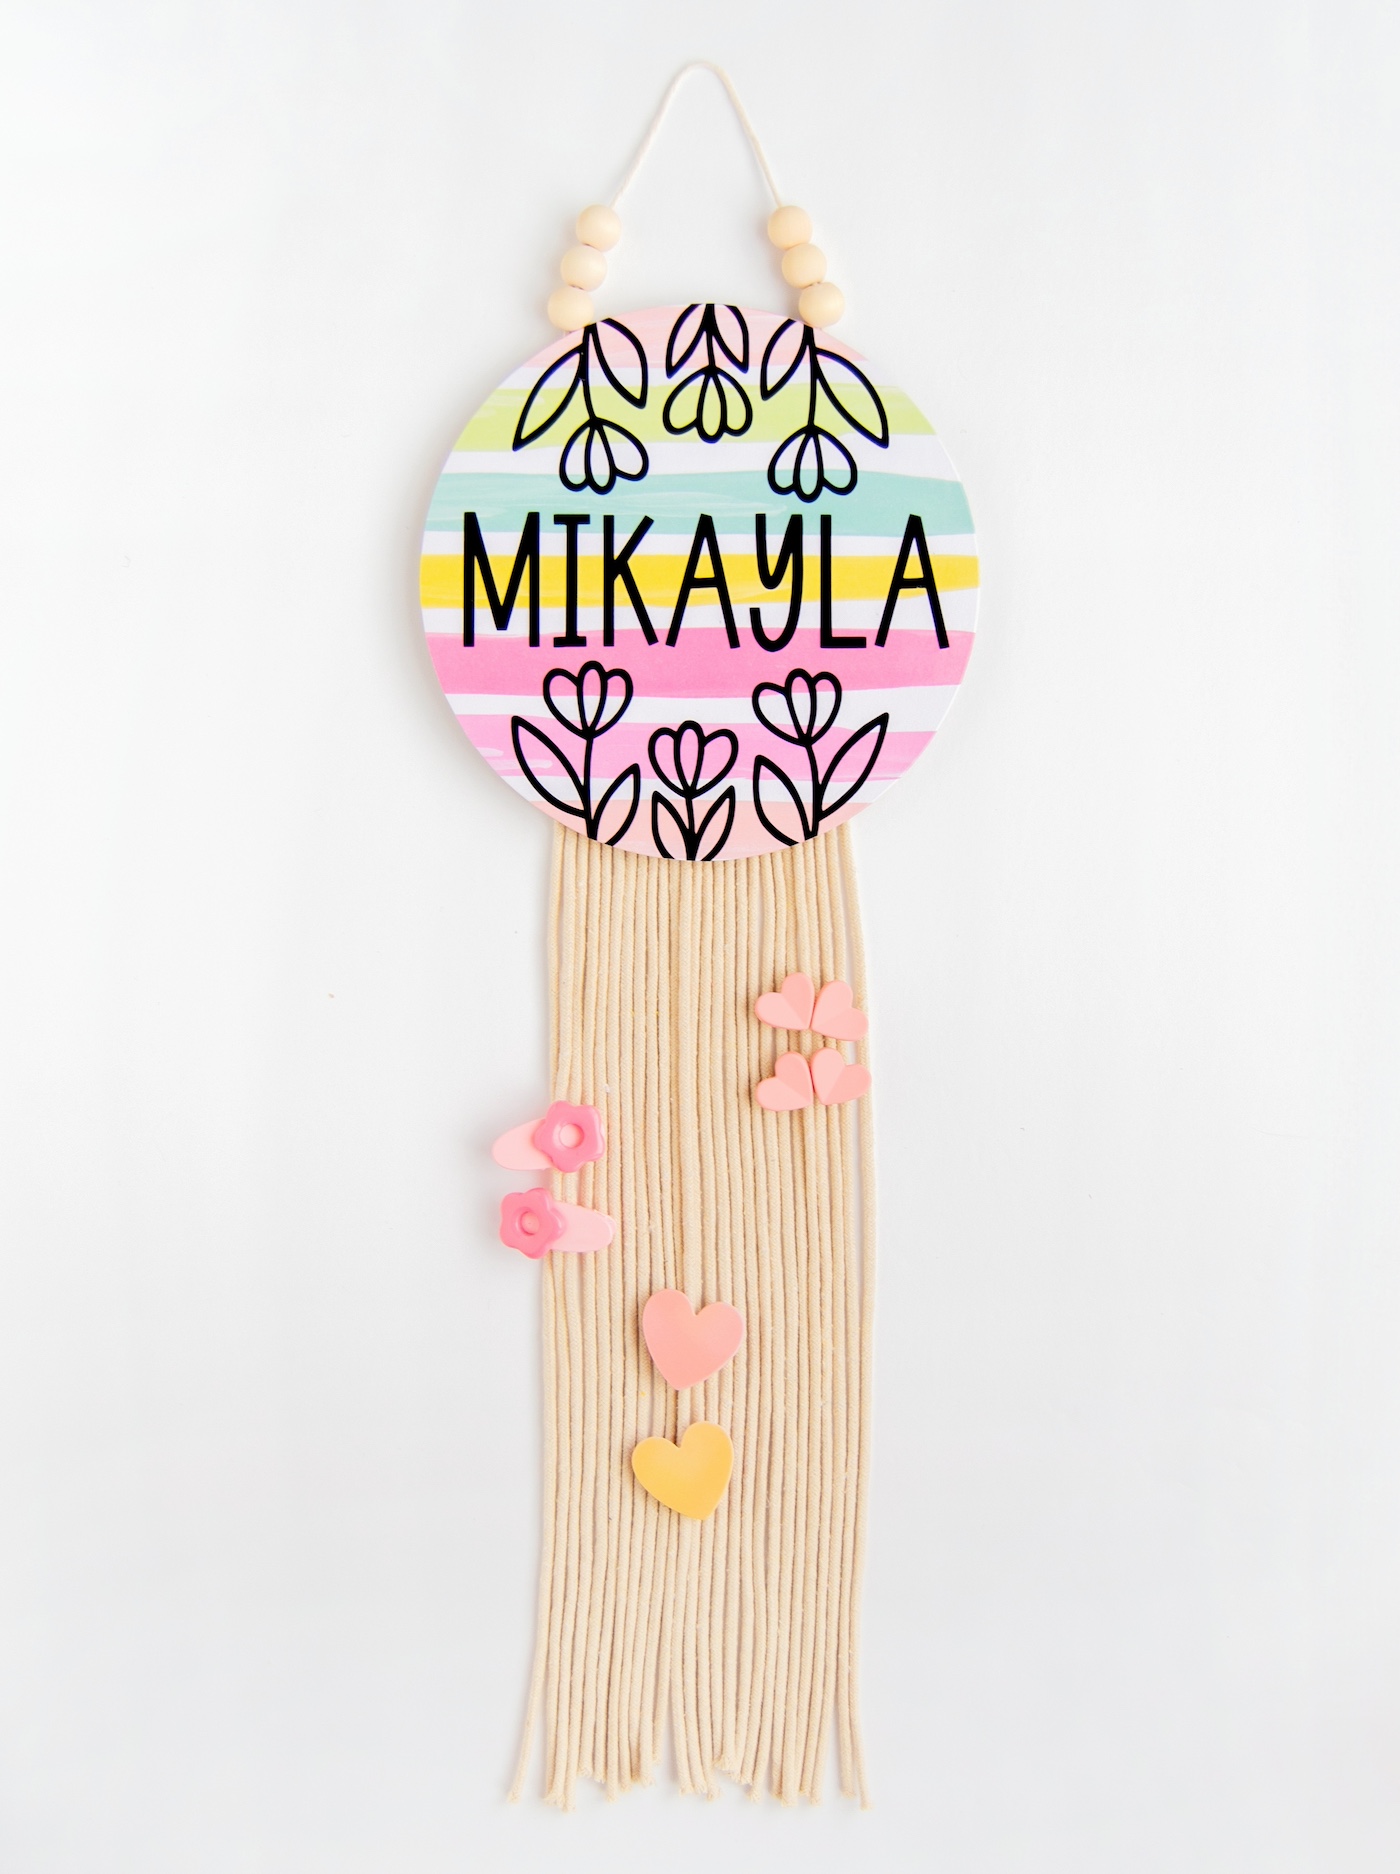
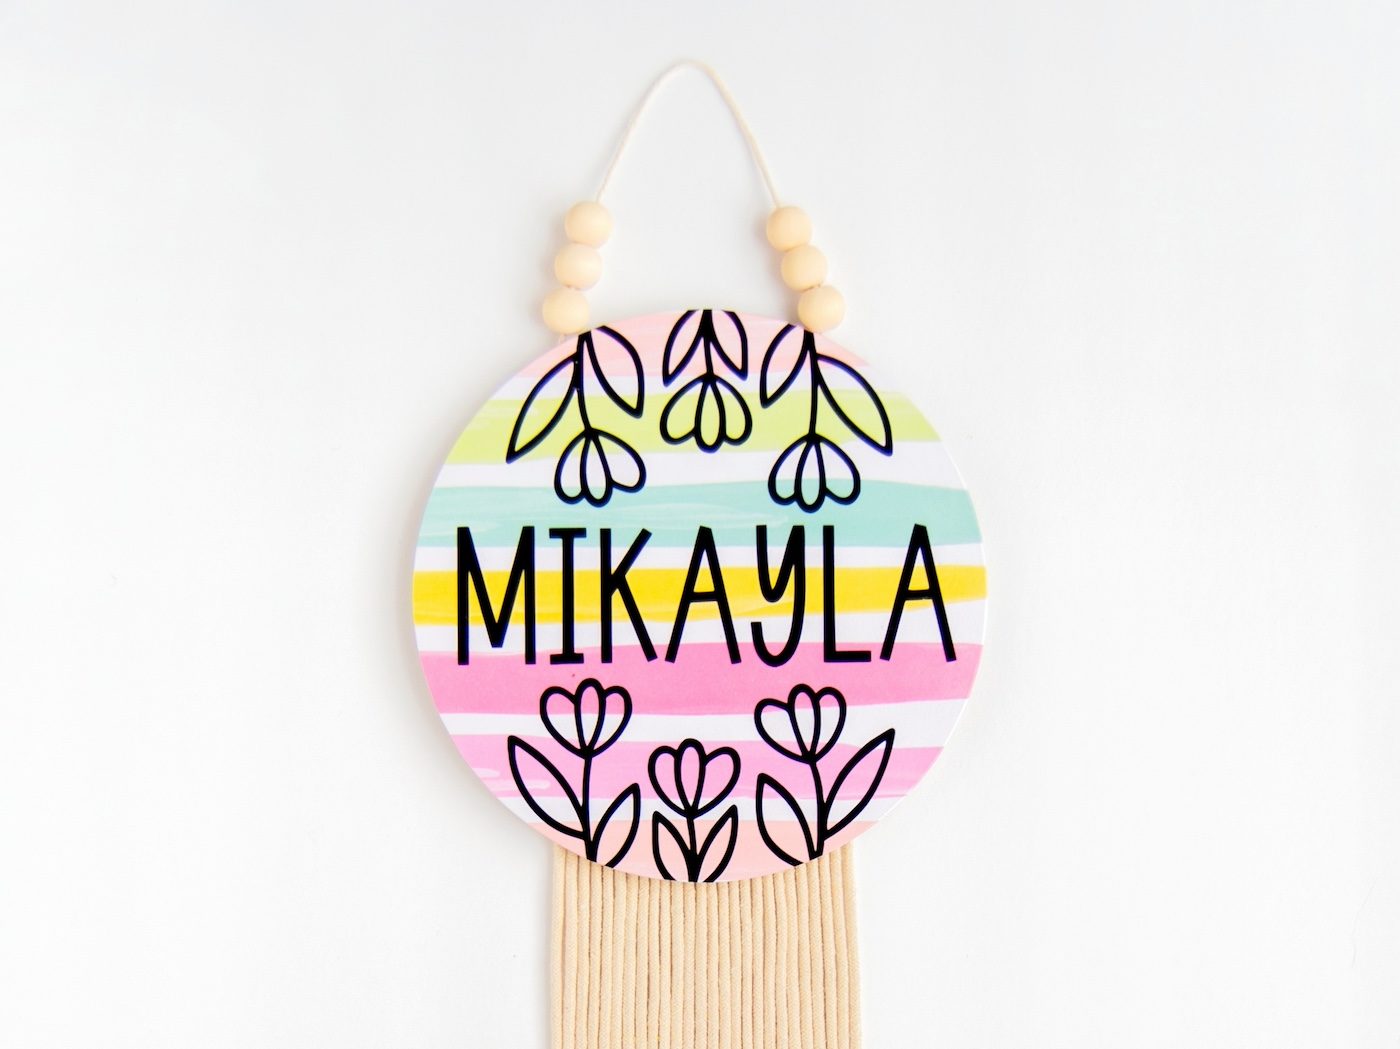
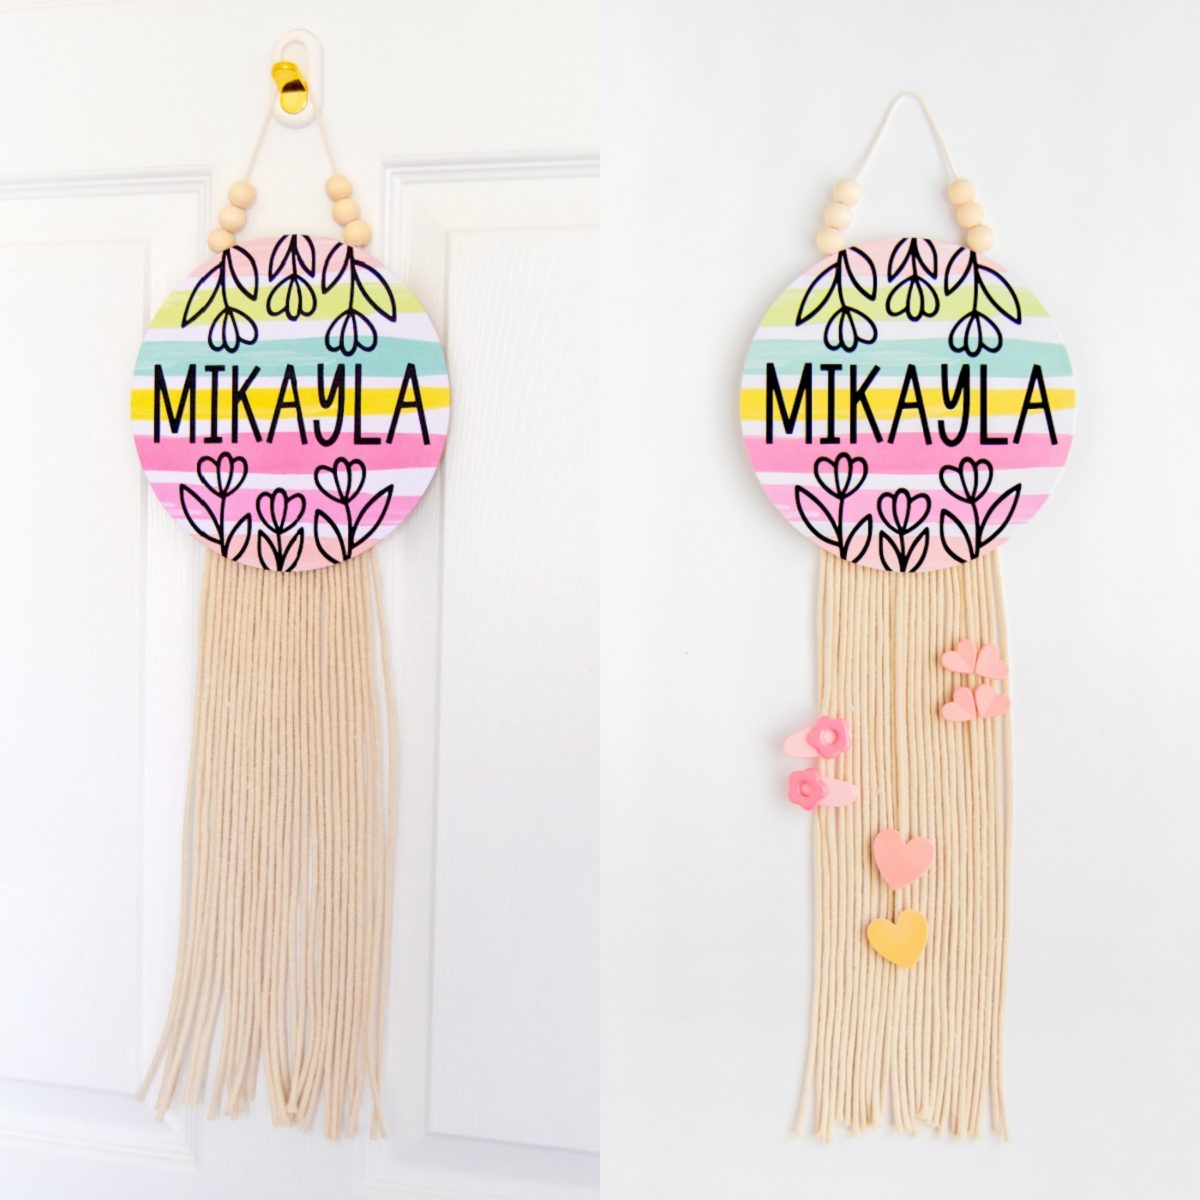
This wooden plaque organizer is a wall-worthy house decor answer to the endless bow chaos—and she’s completely customizable to match your child’s room, your craft room, or perhaps a reward theme.
Why You’ll Love This Venture:
- You don’t want fancy instruments. (Until you rely Mod Podge as a device, which—actually—you must.)
- It’s an excellent use for that scrapbook paper you’ve been hoarding.
- No die cutter? No drama. I’ve received low-tech choices for the vinyl part.
- Children might help too—particularly should you’re okay with a little bit further glitter in your flooring. #Reminiscences
Professional Suggestions Earlier than You Commence:
- Go together with a Mod Podge end that fits your type—Matte for farmhouse stylish, Gloss for vivid and trendy, or Sparkle should you imagine each bow deserves a little bit disco.
- Use macrame twine in colours that match your kiddo’s aesthetic—or allow them to decide. Once they’re concerned, they’re extra more likely to use it.
- Need to reward this? Personalize it with a reputation or monogram utilizing vinyl or letter stickers.
Have older kids? Teenagers and preteens can possible make it themselves, and make the paper and artwork extra age acceptable.
And let’s be sincere: it feels very satisfying to hold this on the wall and say, “See? We’re an organized household now.” (Simply don’t open the junk drawer.)
Able to ditch the drawer catastrophe and present these bows who’s boss? Let’s get artful. If you wish to use our floral designs – the SVG and PNG can be found for private use.
Get the printable easy methods to card for this simple craft thought under:
DIY Bow Organizer
Learn to make a DIY bow holder that you could personalize with a reputation! Cute for a nursery or little women’ room.
Prep Time10 minutes minutes
Energetic Time50 minutes minutes
Dry Time30 minutes minutes
Whole Time1 hour hr 30 minutes minutes
Yield: 1 holder
Value: $10
- 1 Wooden plaque spherical
- 1 sheet Scrapbook paper
- Mod Podge Gloss
- Vinyl
- Clear switch tape for vinyl
- Macrame cotton twine
- Skinny cotton twine
- 2 Popsicle sticks
- Wooden beads
-
Hint the circle (or no matter form of plaque you might have) onto the again of your scrapbook paper of selection and lower to dimension with the scissors.
-
Apply a skinny however even quantity of Mod Podge onto the floor of your plaque and adhere your scrapbook paper. Use a squeegee device to push extra Mod Podge to the perimeters of the plaque and guarantee a good, clean floor. Let it dry for 15 – 20 minutes.
-
Dimension the floral design and your chosen title relying on how huge your plaque is in your chopping software program, and lower. Weed (take away) the surplus vinyl and the insides of the letters and floral design.
-
Use switch tape to use your vinyl design onto the plaque, ensuring it’s adhered earlier than rigorously peeling the switch tape off. Minimize any extra vinyl that goes over the sting of your plaque.
-
Apply a skinny coat of Mod Podge over the vinyl-ed plaque to guard the paper and vinyl from getting stained, scraped, or broken. Let dry.
-
Minimize 24” lengthy strands of macrame twine (or shorter if you’d like a shorter holder). I lower 13 lengths. Fold them in half and use scorching glue to stick all of them onto a chunk of a large popsicle stick. You could wish to lower the ends of the popsicle stick if there’s any extra, or if it hangs over the perimeters of your plaque.
-
Use scorching glue to connect the underside hanger onto the again of the plaque, ensuring it’s centered and straight if you take a look at it from the entrance facet of the plaque.
-
Minimize a size of skinny cotton twine and tie a knot on every finish. You can even select so as to add beads for a extra boho-modern look, however you’ll be able to skip this if desired. Use scorching glue and connect every finish onto one facet of a popsicle stick.
-
Use scorching glue to connect the hanger onto the again of the plaque, ensuring it’s centered and straight like step 7. Let the recent glue cool fully earlier than hanging.
No chopping machine? No downside – you need to use vinyl letters, stickers, or wooden letters from the craft retailer so as to add a reputation to your hanger.
What do you consider this bow holder? Let me know within the feedback! I’d love for you to take a look at these different posts as effectively:
Cardboard Letters • Ornamental Push Pins • Enhance a Reminiscence Field • DIY Closet Dividers • DIY Picture Mat • DIY Cork Boards • Ice Cream Stick Wall Hanging • Mason Jar Evening Mild • Mini Plastic Animal Artwork • Wooden Welcome Signal