On this submit I’ll present you how one can do paper serviette decoupage on a wooden body utilizing the iron on methodology! That is simple sufficient for freshmen.
Abilities Required: Newbie. It helps to have expertise with Mod Podge to do that undertaking. You’ll be making use of it to a body, then ironing a serviette down. I’ll stroll you thru the method.
There are a number of methods to make use of Mod Podge to use paper or material to surfaces. One of the frequent methods is to use it on to a floor, then apply the paper/different materials down and let dry. Then add a high coat of Mod Podge and let it dry once more.
That’s the best way I decoupage most frequently right here on the weblog.
However the factor is, that works higher for thicker supplies and materials – and never as properly for thinner supplies like tissue paper, napkins, wrapping paper, and many others.
These gadgets are likely to wrinkle when they’re utilized to moist Mod Podge. Typically crafters use plastic wrap to help in smoothing, however thinner gadgets can nonetheless tear beneath the plastic wrap with out a very cautious contact.
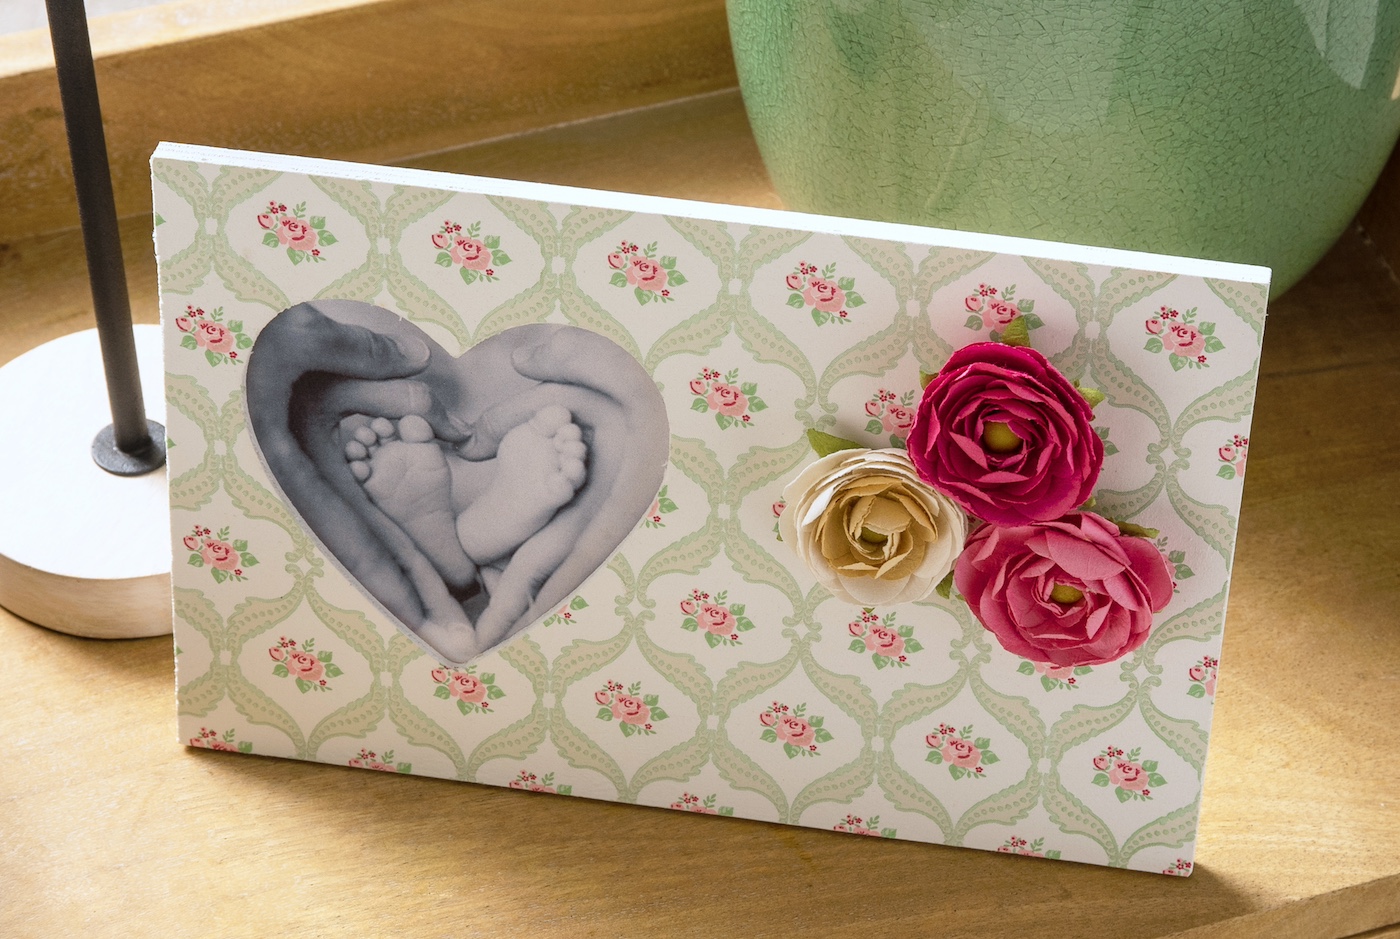
SO I’m actually excited to point out you one thing regularly known as the “iron on methodology” – and on this case, we’re going to do paper serviette decoupage to a wooden body.
This methodology, which permits the Mod Podge to dry BEFORE making use of the serviette, is a nice answer while you simply can’t decoupage your gadgets with out wrinkles. When the gadgets are thinner – that is tremendous simple.
For this paper serviette decoupage, you’ll be portray the wooden body, then making use of Mod Podge and letting it dry. Then you definately’ll iron on the serviette, activating the Mod Podge under. The serviette will adhere to the floor.
You may must follow this method a few instances to grasp it, however it’s means simpler than different strategies. When you see how easy the floor seems . . . you’re going to get hooked.
To begin with, right here’s what you’re going to wish. Then you’ll be able to soar proper in and get crafting!
Collect These Provides
- Wood body of your selection
- White acrylic paint
- Mod Podge – any system
- Ornamental paper serviette
- Paper flowers
- Craft glue or sizzling glue
- Mini craft iron
- Parchment paper
- Emery board
Ideas and Ideas for This Challenge
You don’t *have* to color the body white, nonetheless, it makes the colours of the serviette pop. It’s additionally simple to do, so I at all times do it. You should use spray paint, however craft paint is cheaper and simply as rapid with a curler.
I didn’t seal the highest of the napkins with Mod Podge – it tends to make them wrinkle. In the event you do seal with Mod Podge and the napkins wrinkle, you’ll be able to place parchment down and iron excessive once more.
Get the printable how one can card with directions for this undertaking under:
Paper Napkin Decoupage
Discover ways to decoupage a paper serviette to a wooden body with utilizing the iron on methodology and Mod Podge.
Prep Time10 minutes minutes
Energetic Time1 hour hr
Dry Time40 minutes minutes
Whole Time1 hour hr 50 minutes minutes
Yield: 1 body
Value: $2
-
Paint the body utilizing white craft paint. Roll on one aspect, let dry, and flip over. Paint different aspect and let dry.
-
Apply a coat of Mod Podge to the wooden; do not do the perimeters. Let dry 15-20 minutes and repeat.
-
Whereas the Mod Podge is drying, separate the serviette from the underside layers. You should use tape to assist. You simply need the highest layer with the design.
-
Place the serviette down onto the body. Place a piece of parchment paper on high of the serviette, and run the craft iron throughout the highest a number of instances. While you’re doing this, the Mod Podge is melting under the serviette, and the serviette is adhering. Maintain going till the serviette is totally adhered, together with the perimeters.
-
Let the body cool after ironing. Use an emery board to softly sand away the surplus serviette. Sanding at an angle works very properly. Proceed till all the additional serviette is eliminated.
-
Use craft glue to stick the gildings. Let dry fully earlier than including a photograph and displaying.
When you have any questions on this method I’d like to know within the feedback! I’d additionally love so that you can go to these different posts: