This submit and pictures could comprise Amazon or different affiliate hyperlinks. If you are going to buy one thing by any hyperlink, I’ll obtain a little fee at no further cost to you. Any provides used could also be given to me freed from cost, nevertheless, all tasks and opinions are my very own.
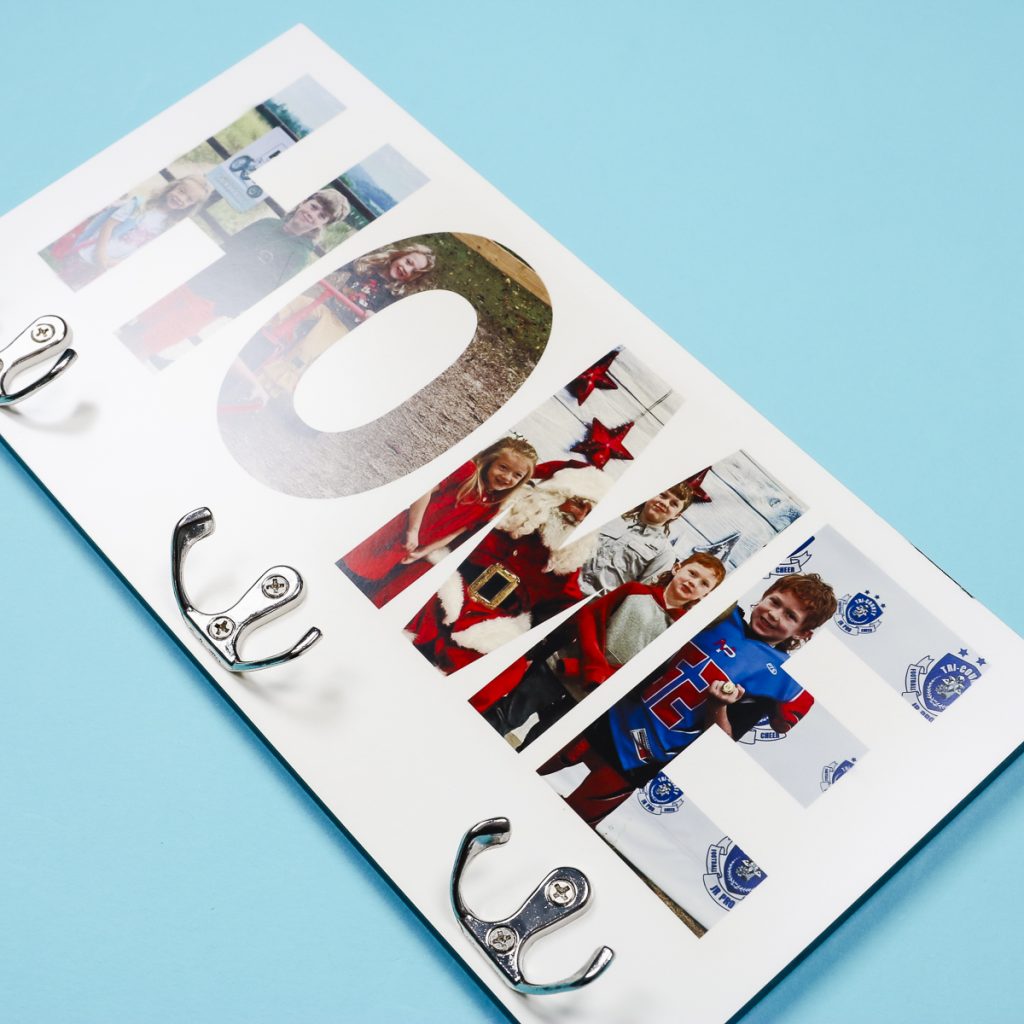
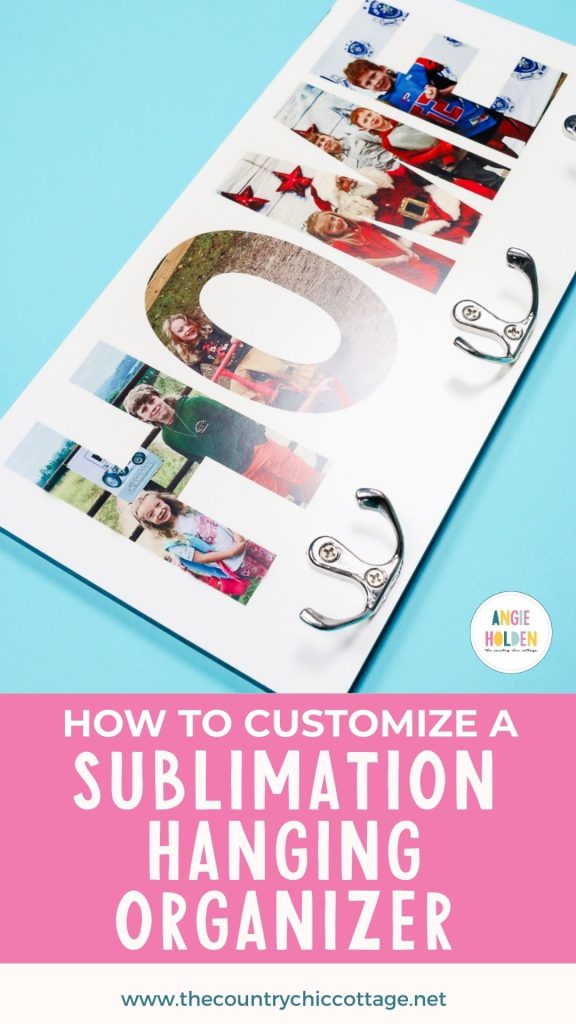
In the event you’re nonetheless in group mode, I believe you are going to love this undertaking. This sublimation hanging organizer is ideal for any room in your house and may be custom-made to match any decor.
Whether or not you are searching for a dwelling on your keys, towels, or canine leashes, this undertaking suits the invoice.
I am utilizing my giant EasyPress immediately. In the event you’re making an attempt to discover the fitting warmth press on your craft room, you may study extra about it in my EasyPress 3 overview.
Pin
I used pictures and the phrase dwelling for my sublimation hanging organizer however you may create this undertaking with any design or phrase you need. If you don’t need to use pictures, you possibly can select an all-over design. You can additionally change the phrase to one thing like Keys, or perhaps a pet’s identify.
You’ll be able to watch me make this undertaking from begin to end by urgent play on the video beneath.
How to Customise a Sublimation Hanging Organizer
This is without doubt one of the best sublimation and group tasks I’ve made this yr. I really like how simple it’s to customise, making it excellent for therefore many alternative areas in your house.
Provides Used
Pin
Step 1. Create Template in Canva
I’m utilizing Canva to create my design immediately, and the method is absolutely simple.
To start, open Canva and click on Create, then select Customized Dimension. I’ve sized my canvas to be the identical dimension as my sublimation paper, which is 8.5 by 11 inches.
Be aware – if you would like to cowl the complete floor or have your phrase go from edge to edge, you will have to use 8.5 by 14 sublimation paper.
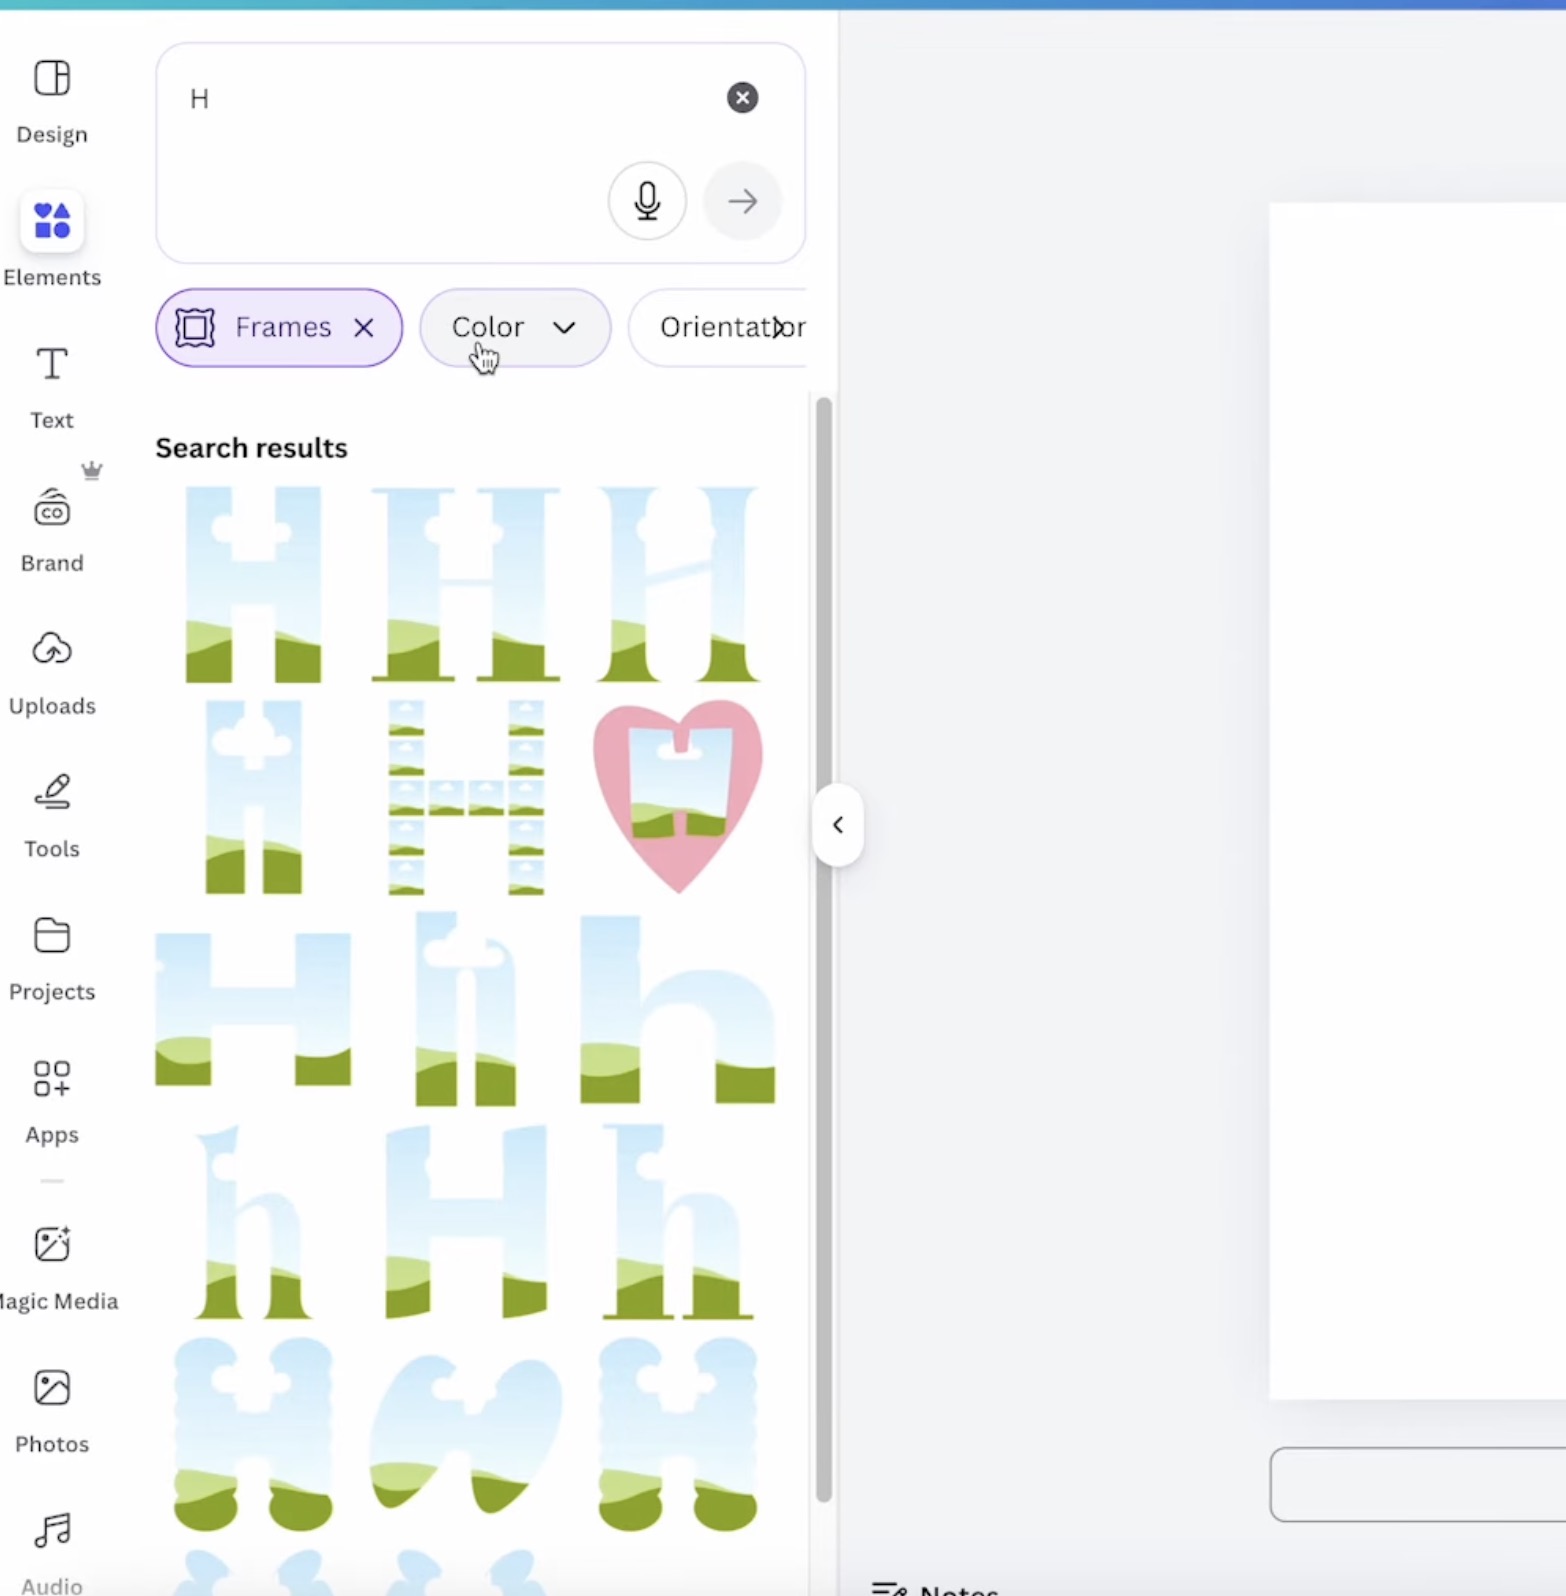
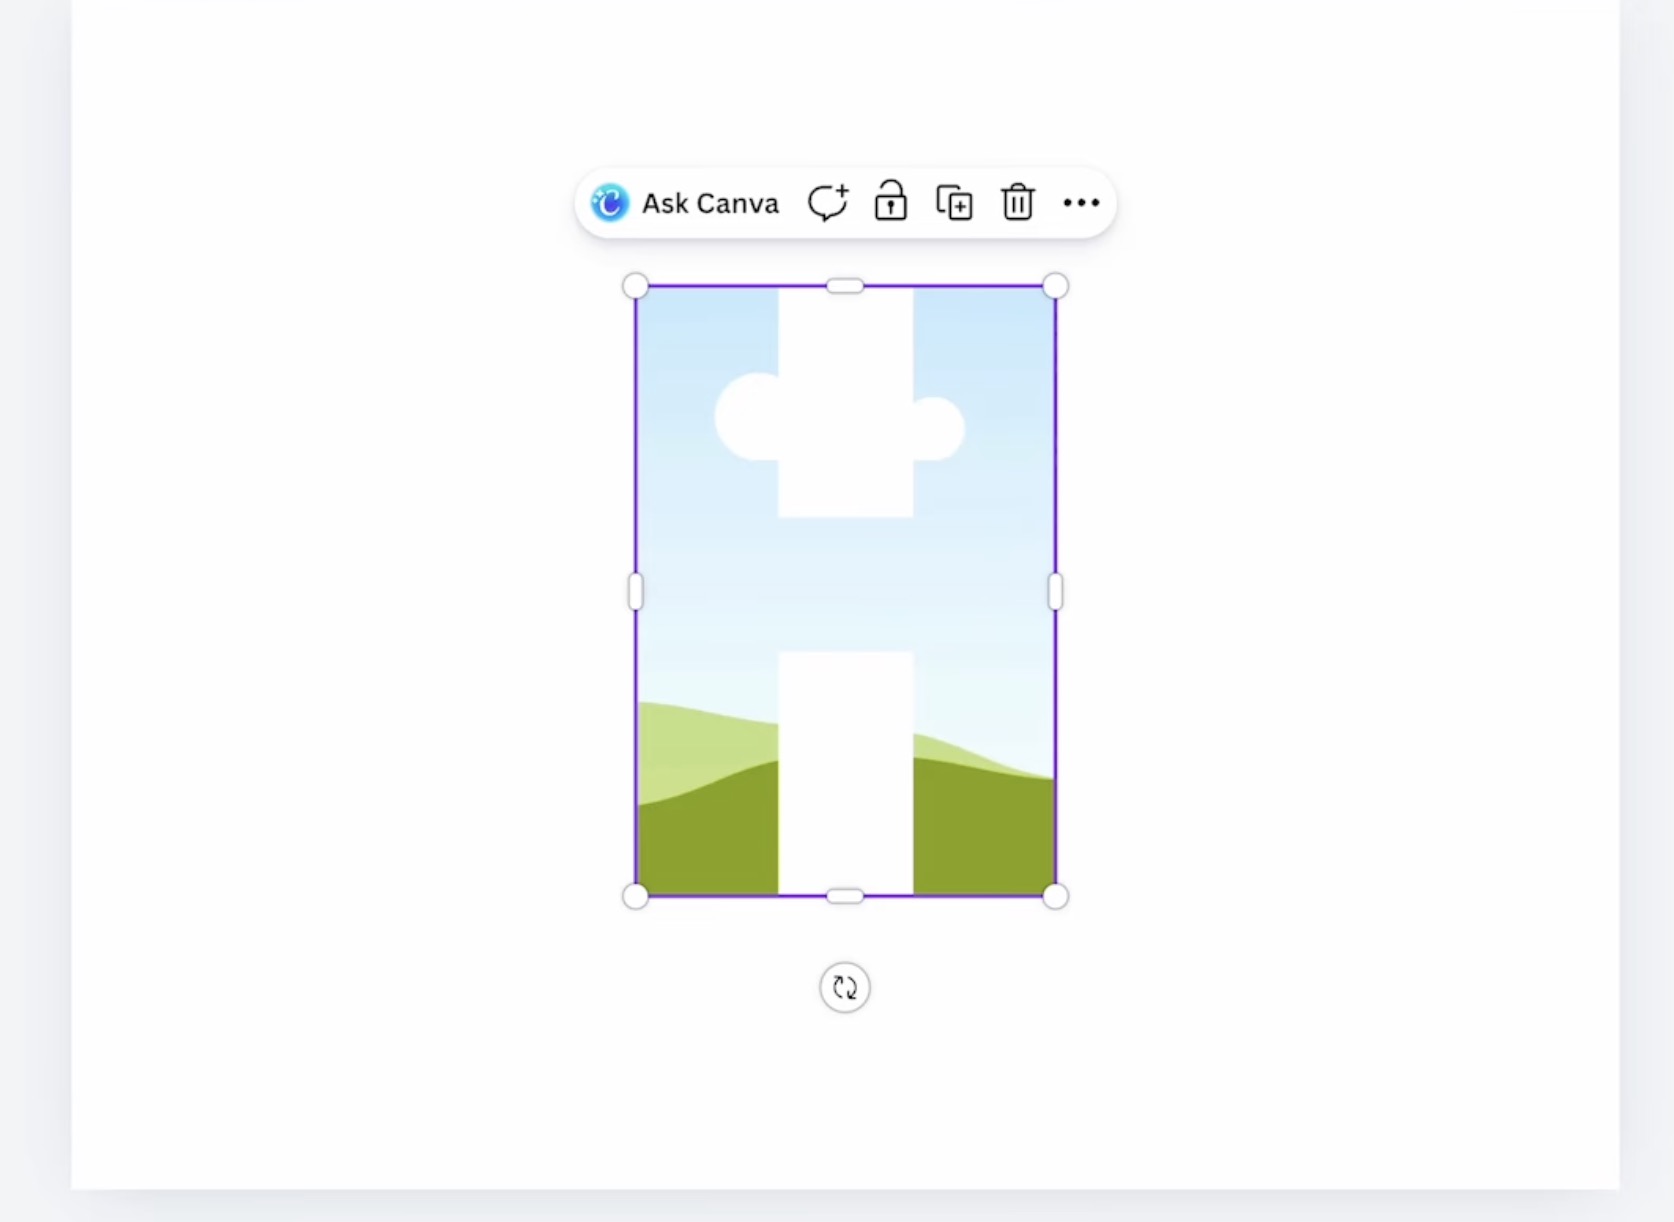
To make your design like I did, first, click on on Components after which seek for the letter you need to use. I typed H, after which, beneath that, I clicked Body.
Pin
Right here you may see a lot of various choices pop up. Select the letter design you want finest, and it’ll add to your canvas.
Pin
Repeat this step for every extra letter.
Pin
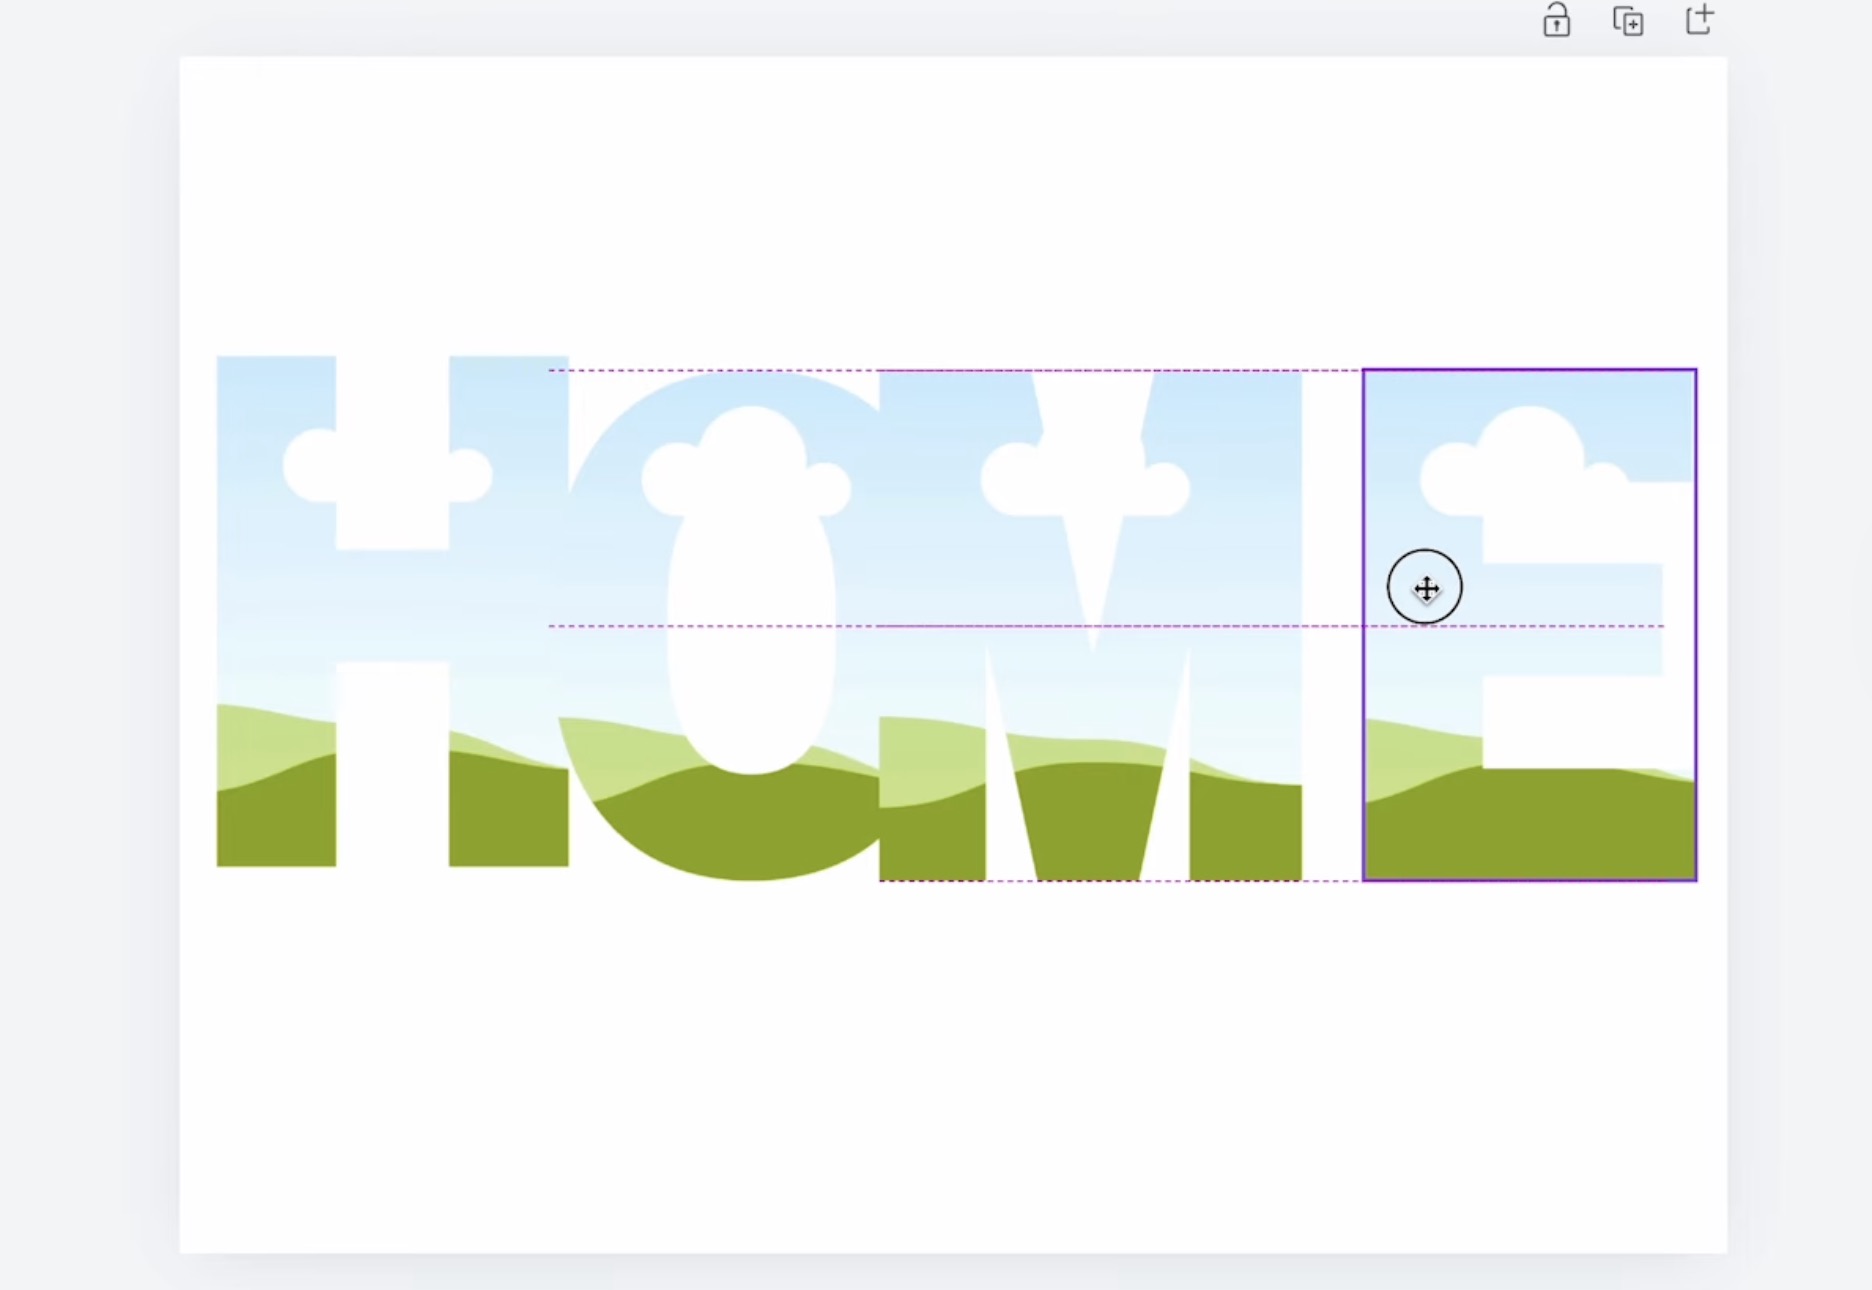
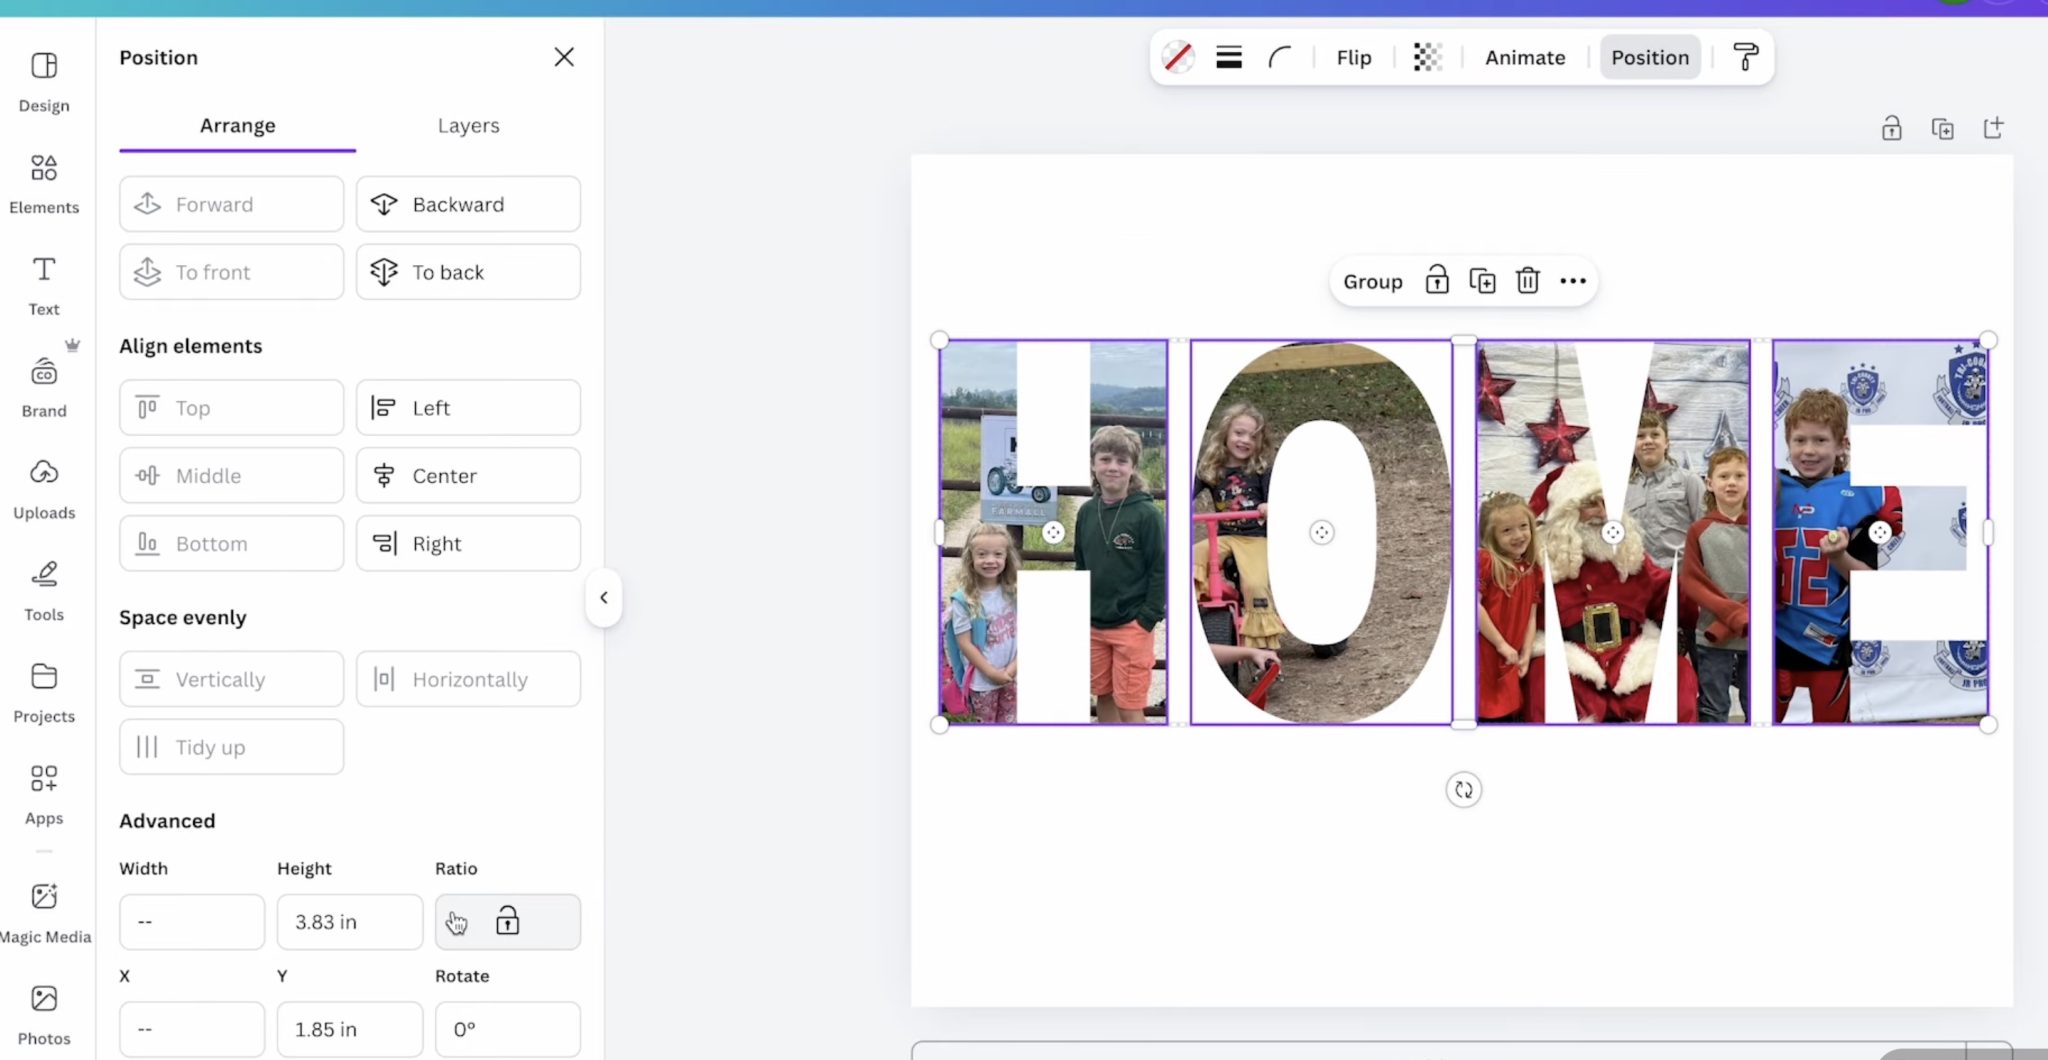
Transfer the letters to spell out the phrase after which resize as wanted.
Choose all of the letters after which click on Place and align the highest. After that, with all of the letters chosen, click on Place and Tidy Up. This may transfer the letters so that they’re all precisely the identical distance aside.
Pin
At this level, you may verify if the design is the scale you need. You may make the letters bigger or smaller and repeat the Place steps.
Step 2. Add Pictures of Your Selection
Subsequent, add the pictures you are going to use.
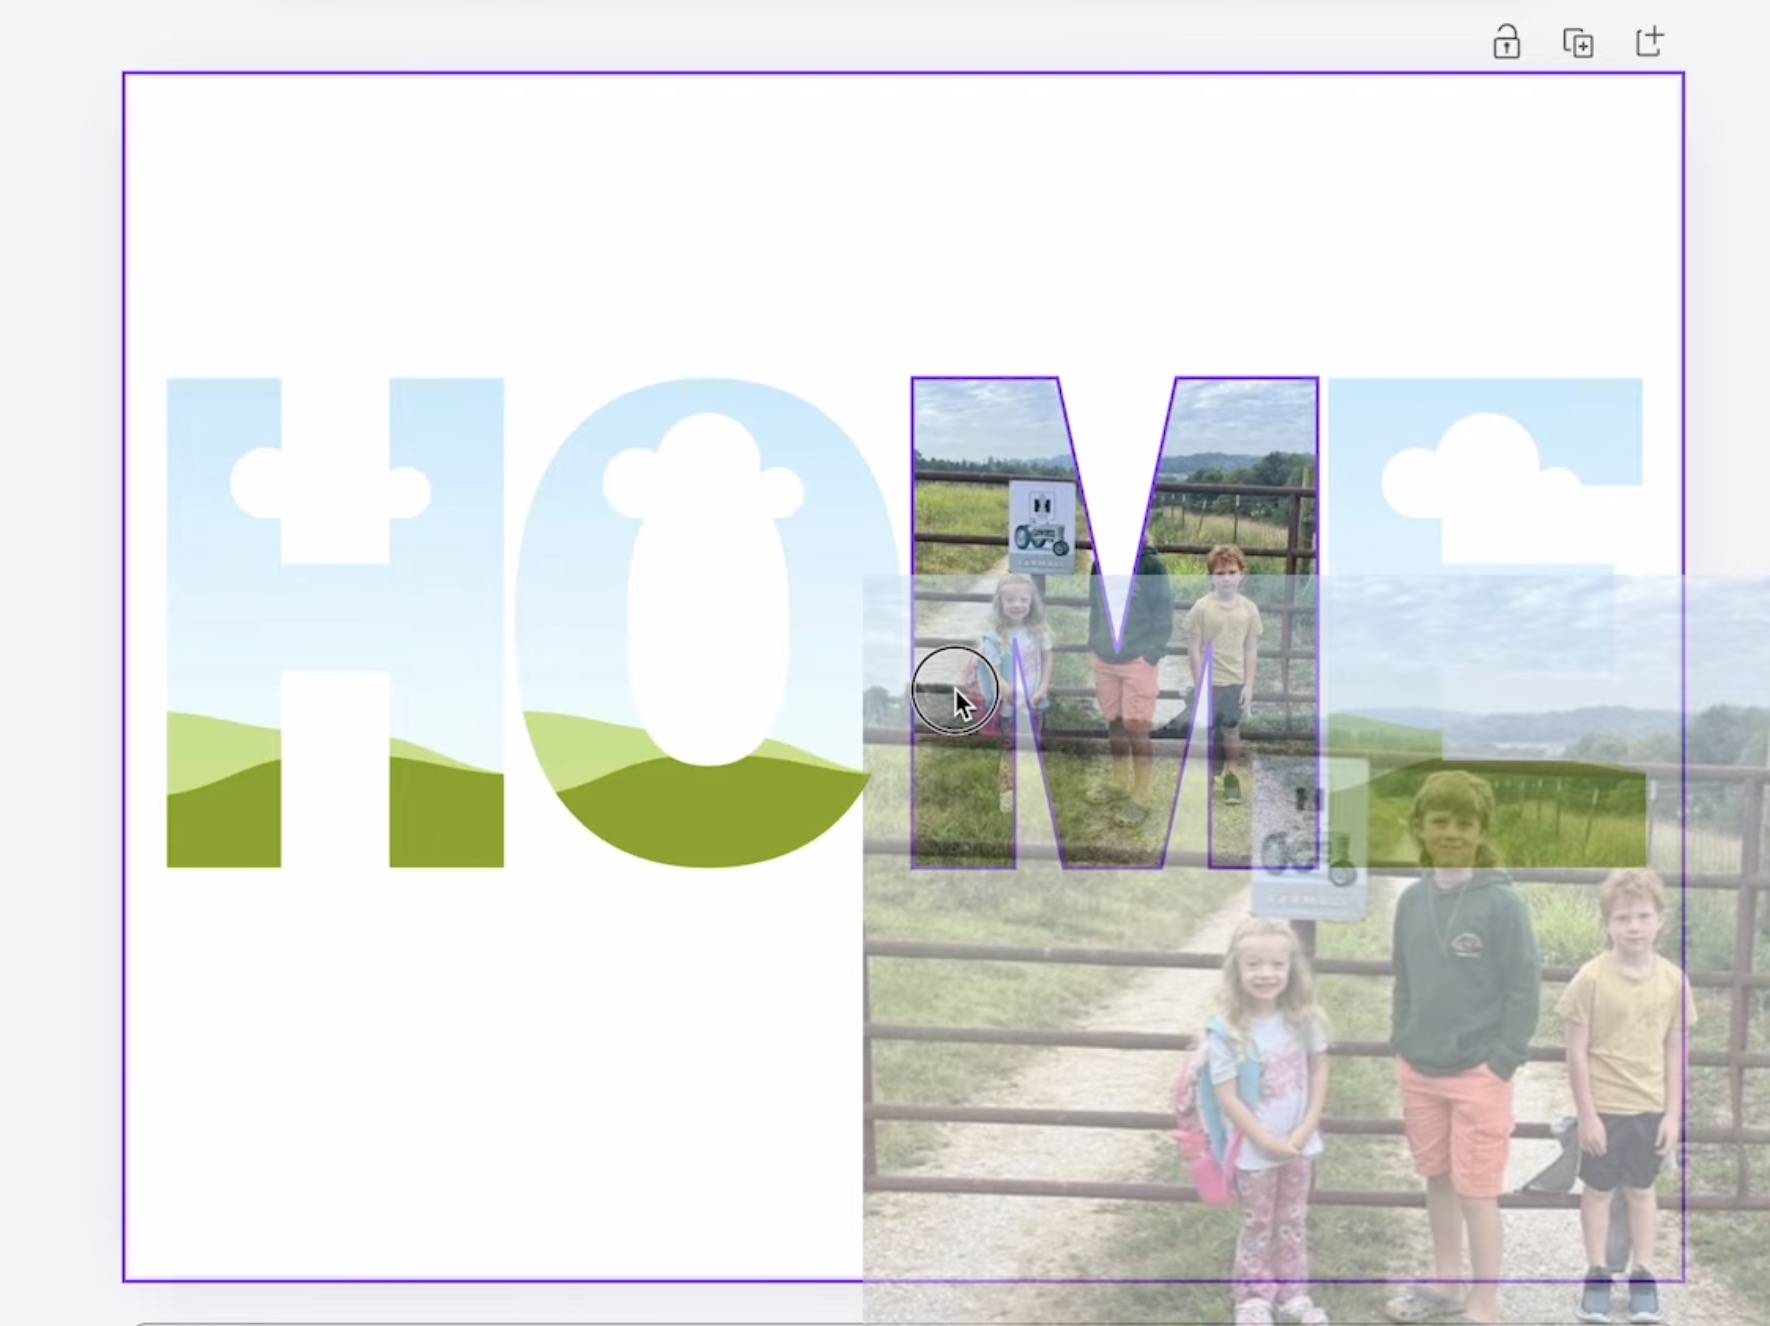
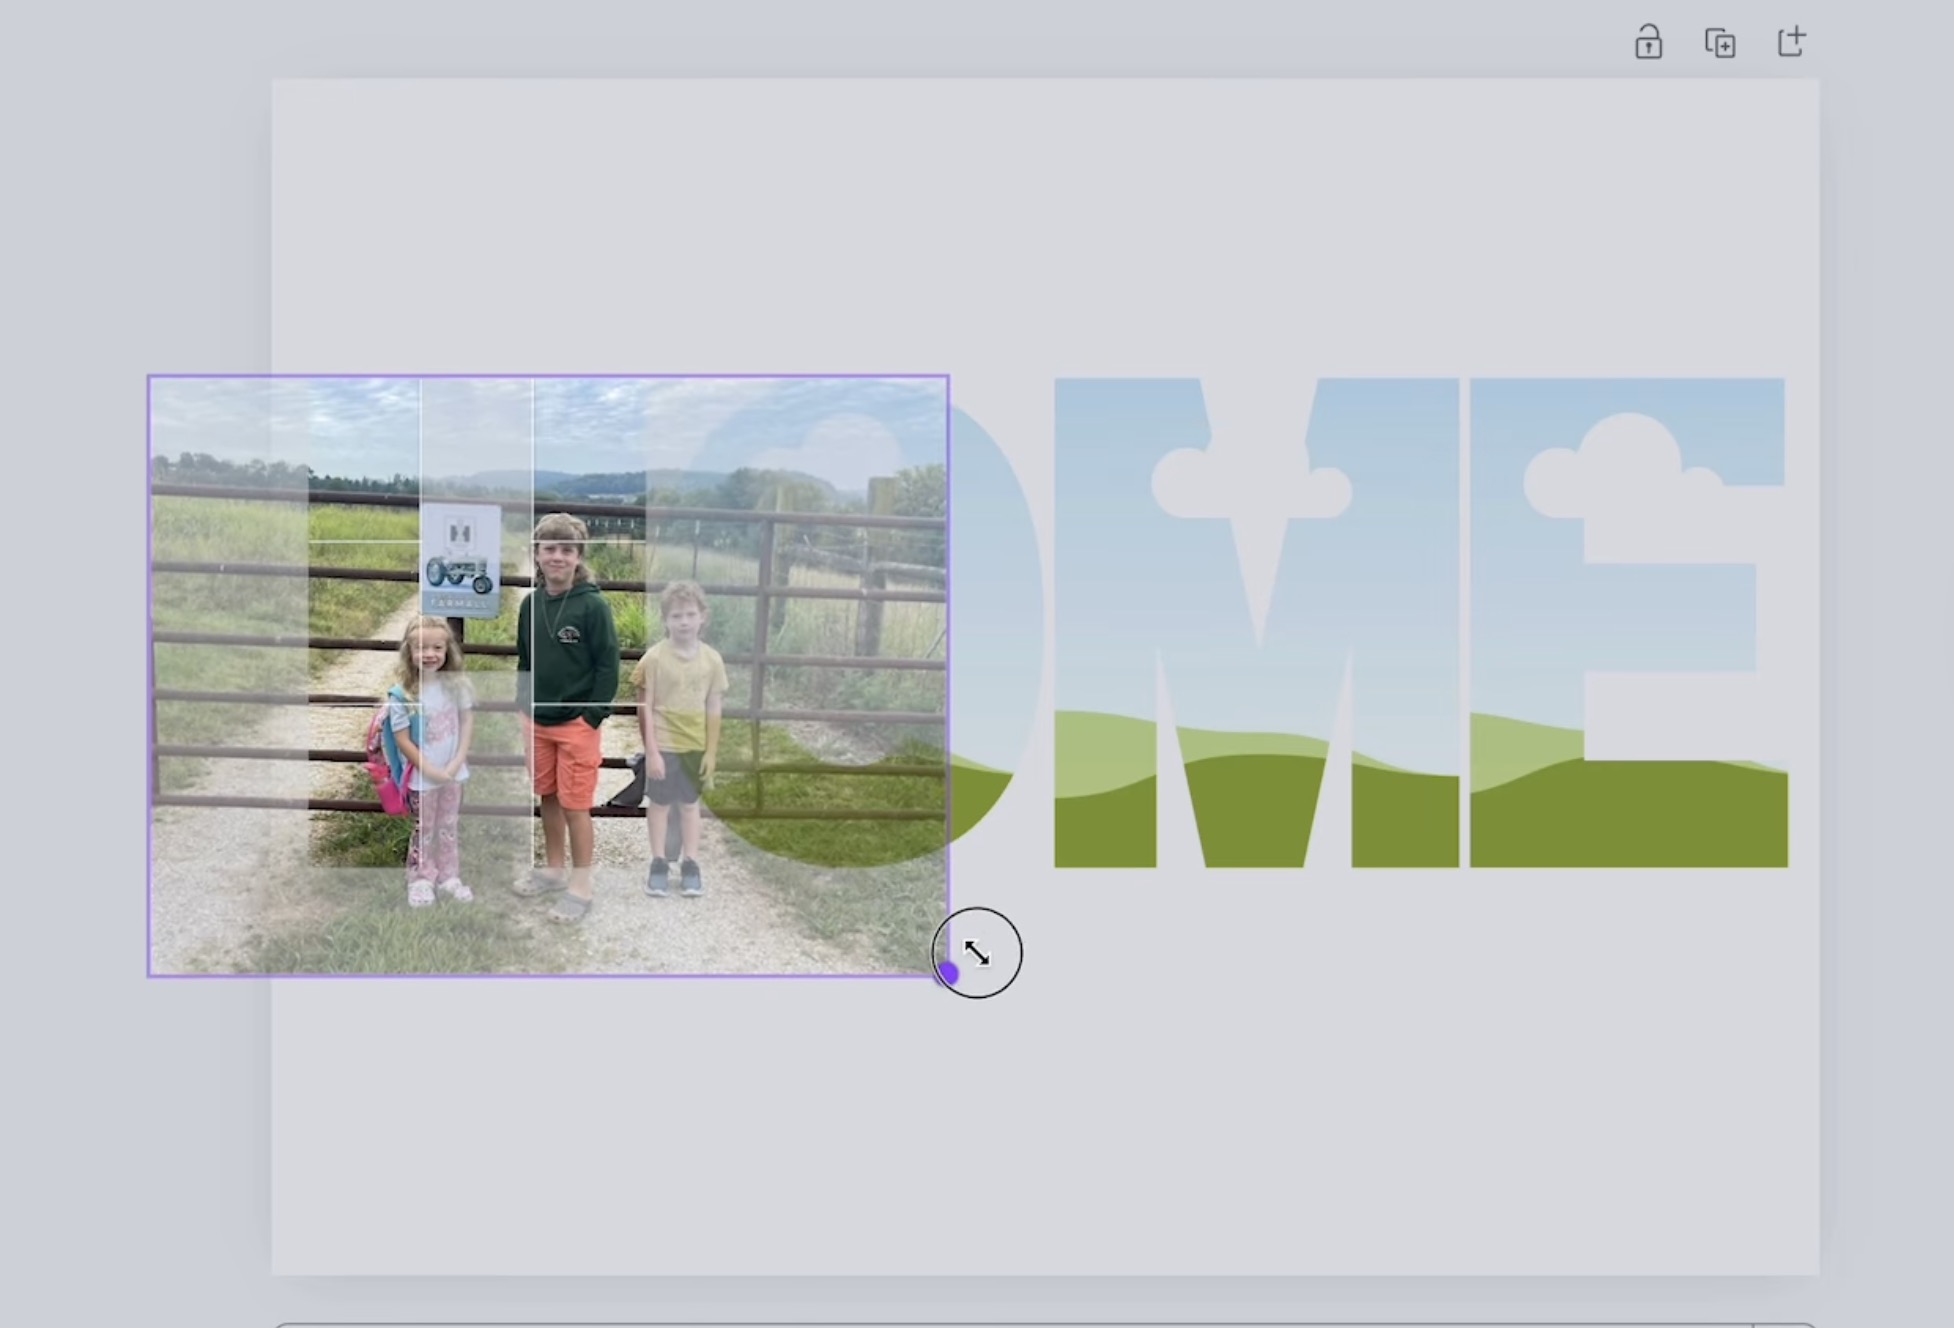
With the pictures uploaded, click on on a picture and drag it to the letter you need and launch it.
Pin
With the picture on the letter, you may double-click the picture and transfer/resize it till it seems such as you need.
Pin
Be aware – in the event you’re utilizing pictures, make certain to concentrate to faces or different necessary elements of the picture so you do not lower them off weirdly.
Repeat this course of for every letter/picture.
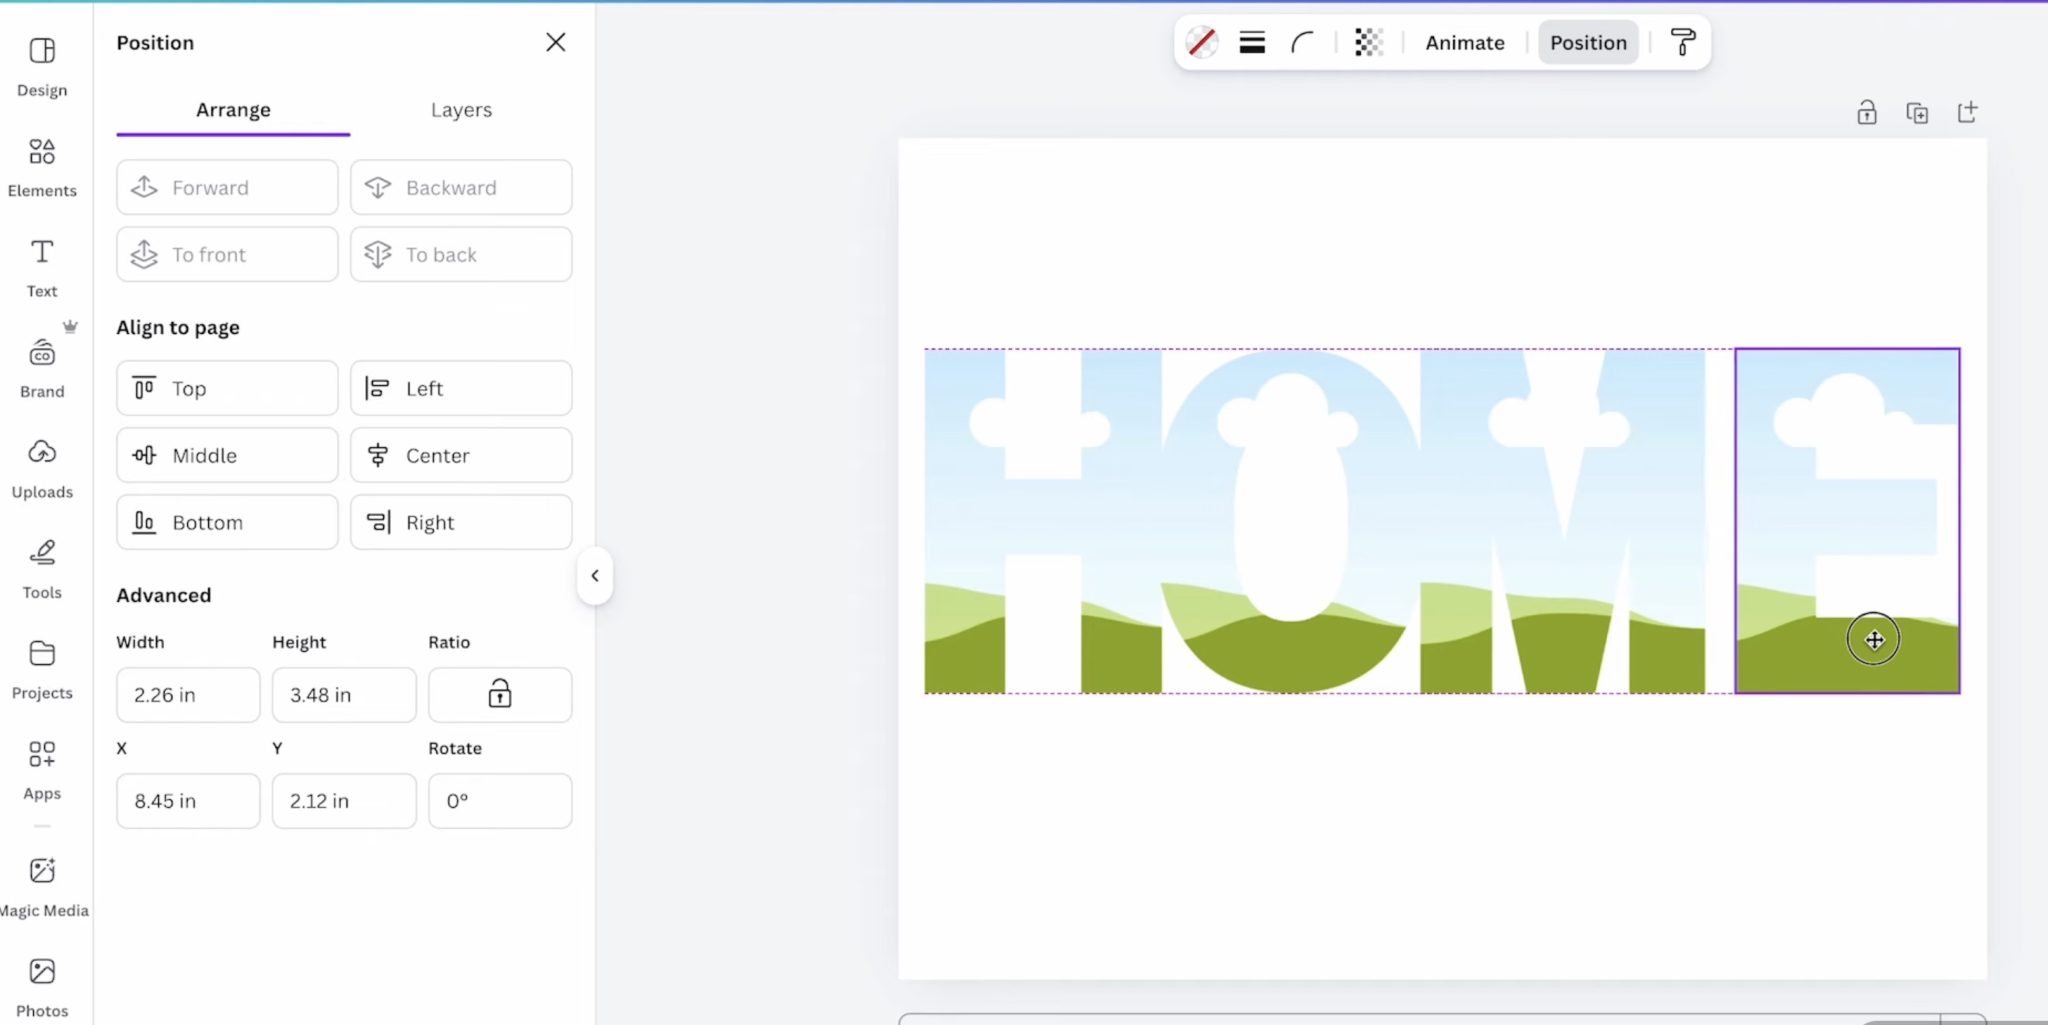
At this level, you may choose all of the letters after which click on Place, and that gives you the precise dimension of your design. Mine measures 3.83 inches excessive and 10.5 inches broad.
Pin
I needed the design to be just below 4 inches, and at 10.5 inches, that leaves a good border on every finish.
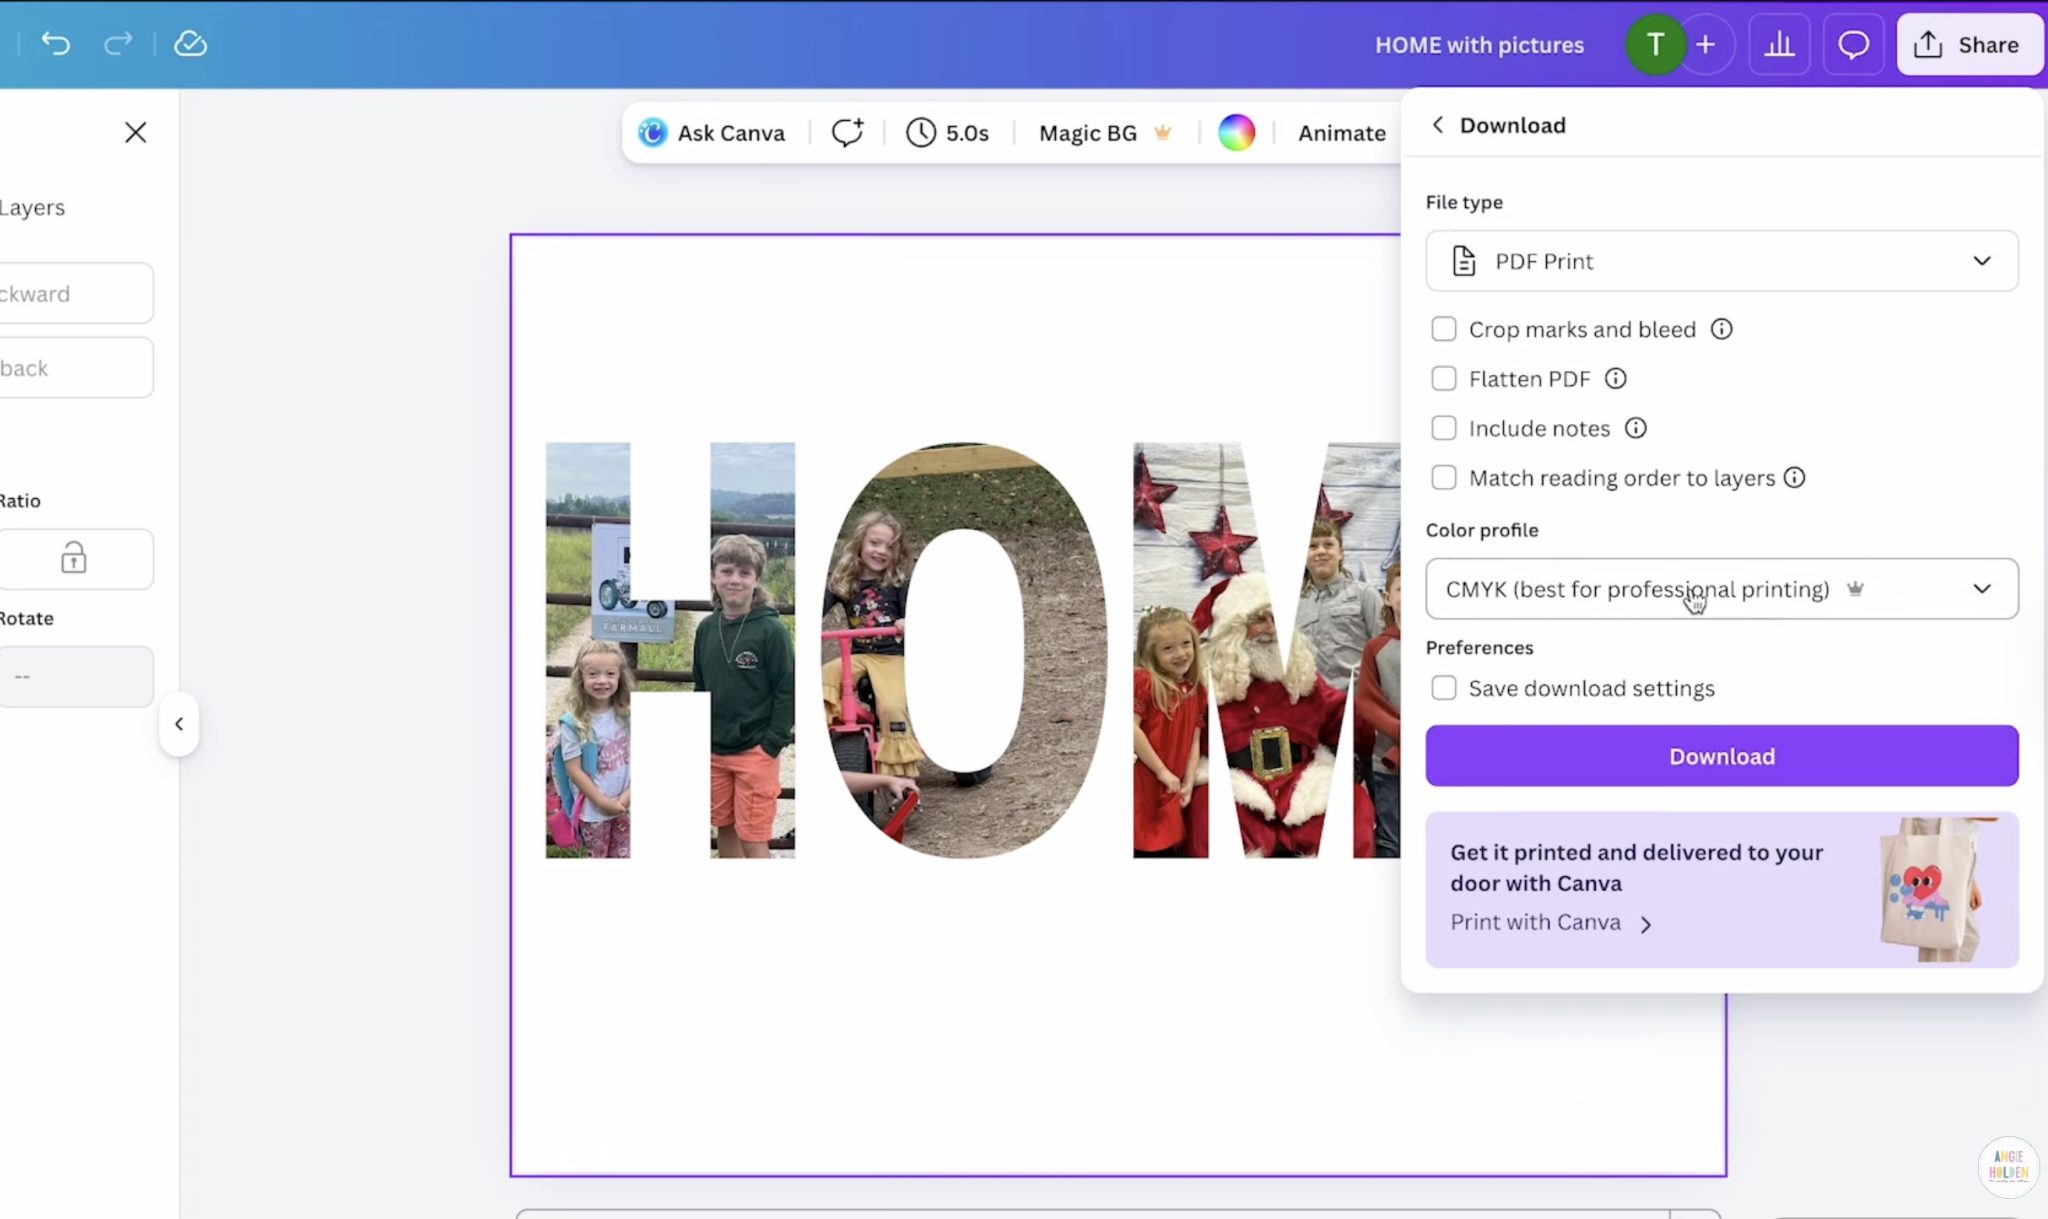
Step 3. Print Design
You can’t print straight from Canva. Click on Share after which Obtain, and I like to select PDF for Print and CMYK. I get one of the best outcomes with these settings and my sublimation printer.
Pin
Be aware – you want to mirror your design. In the event you did not do it throughout the design course of, ensure you do it while you ship it to the printer.
Pin
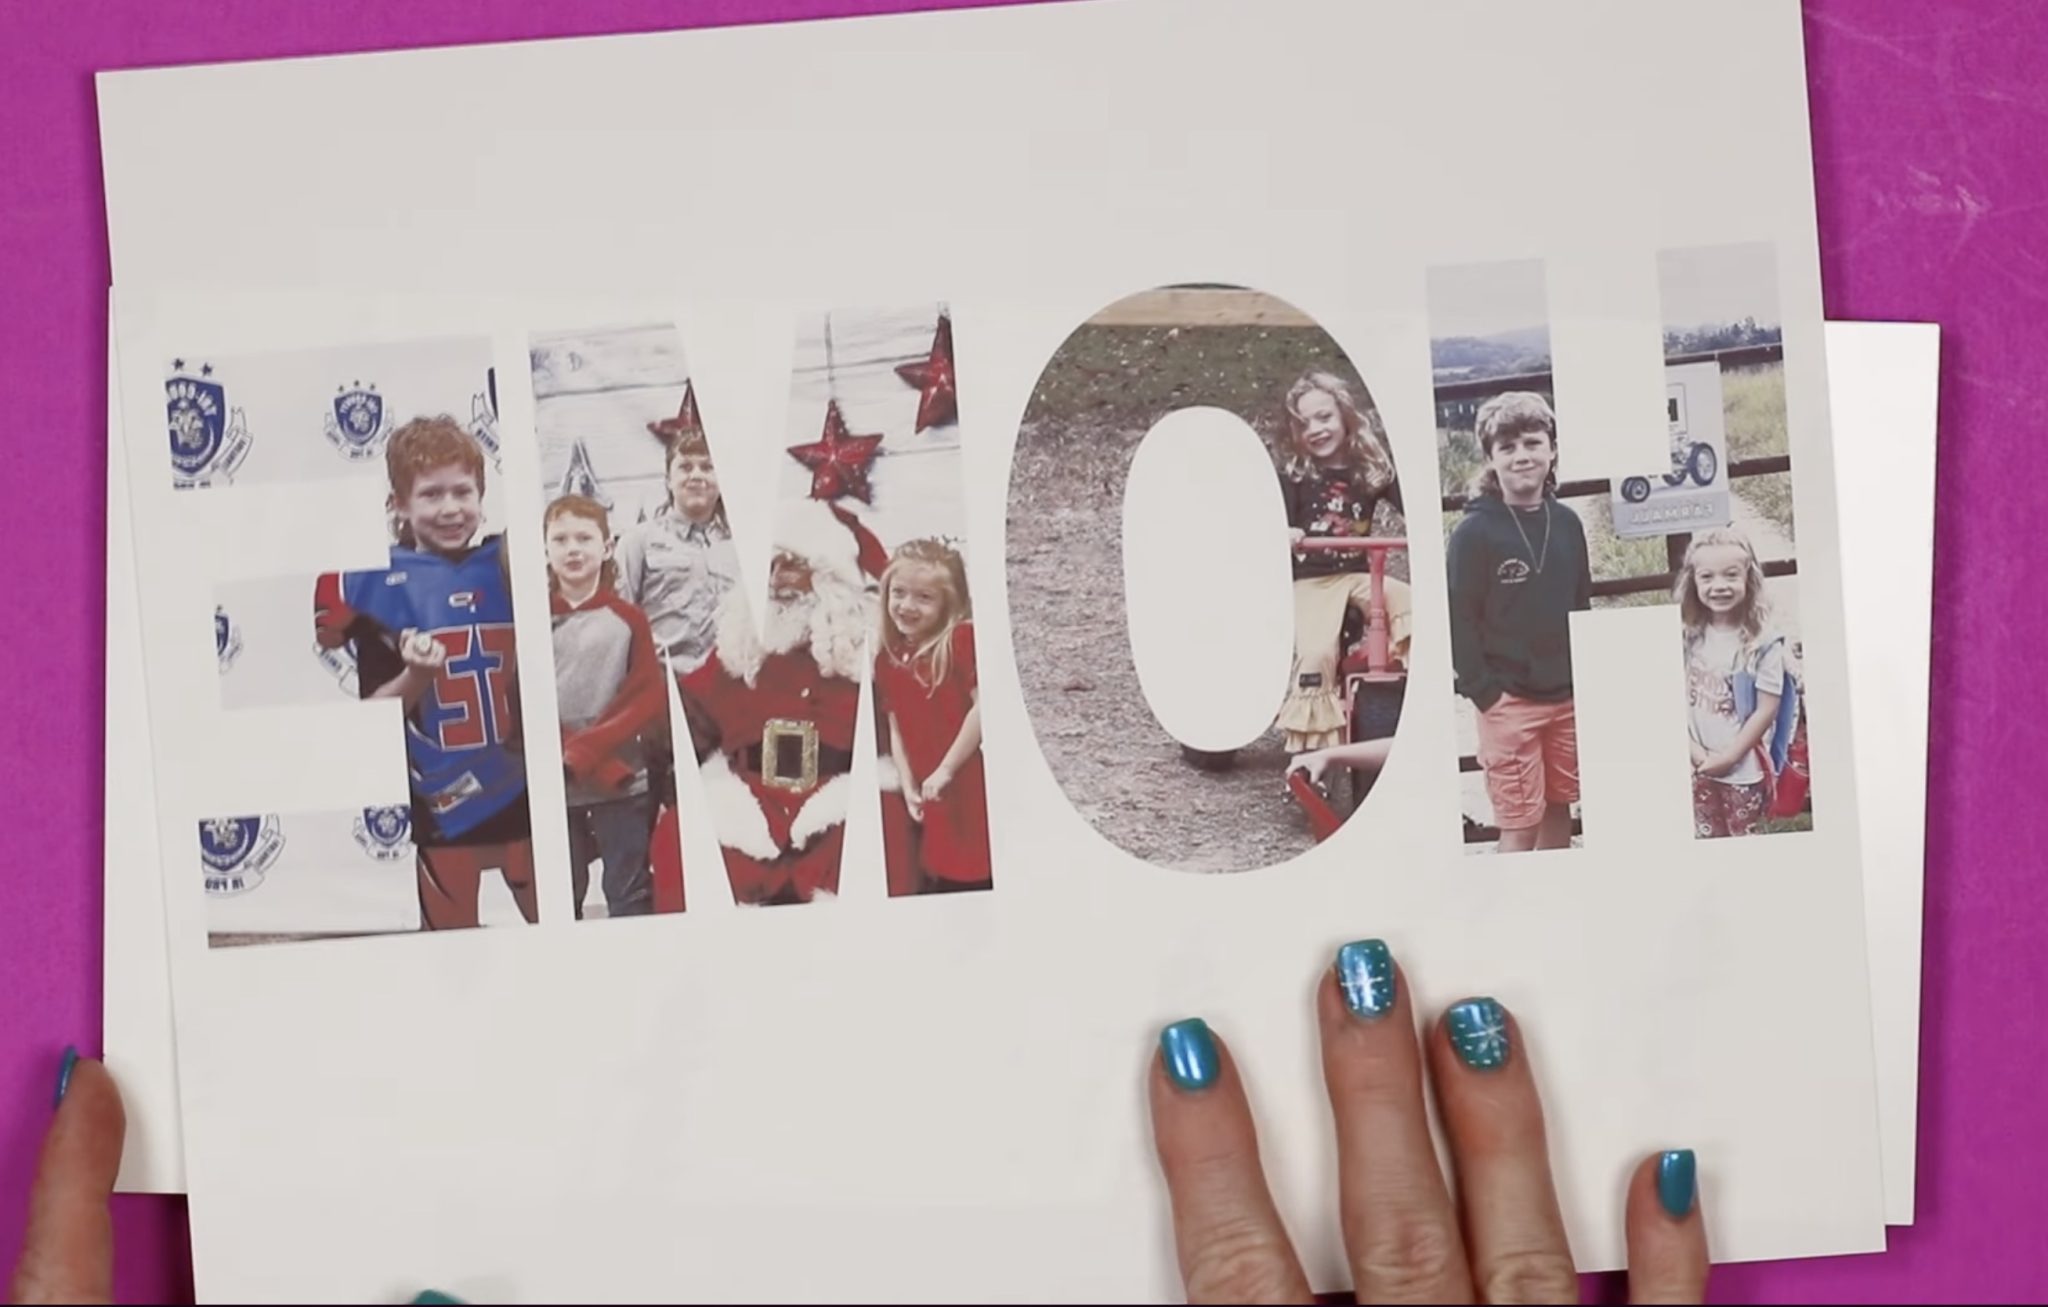
For this undertaking, you want a sublimation print. That’s sublimation ink printed on sublimation paper from a sublimation printer. You’ll be able to’t do that undertaking with a common printer and common ink.
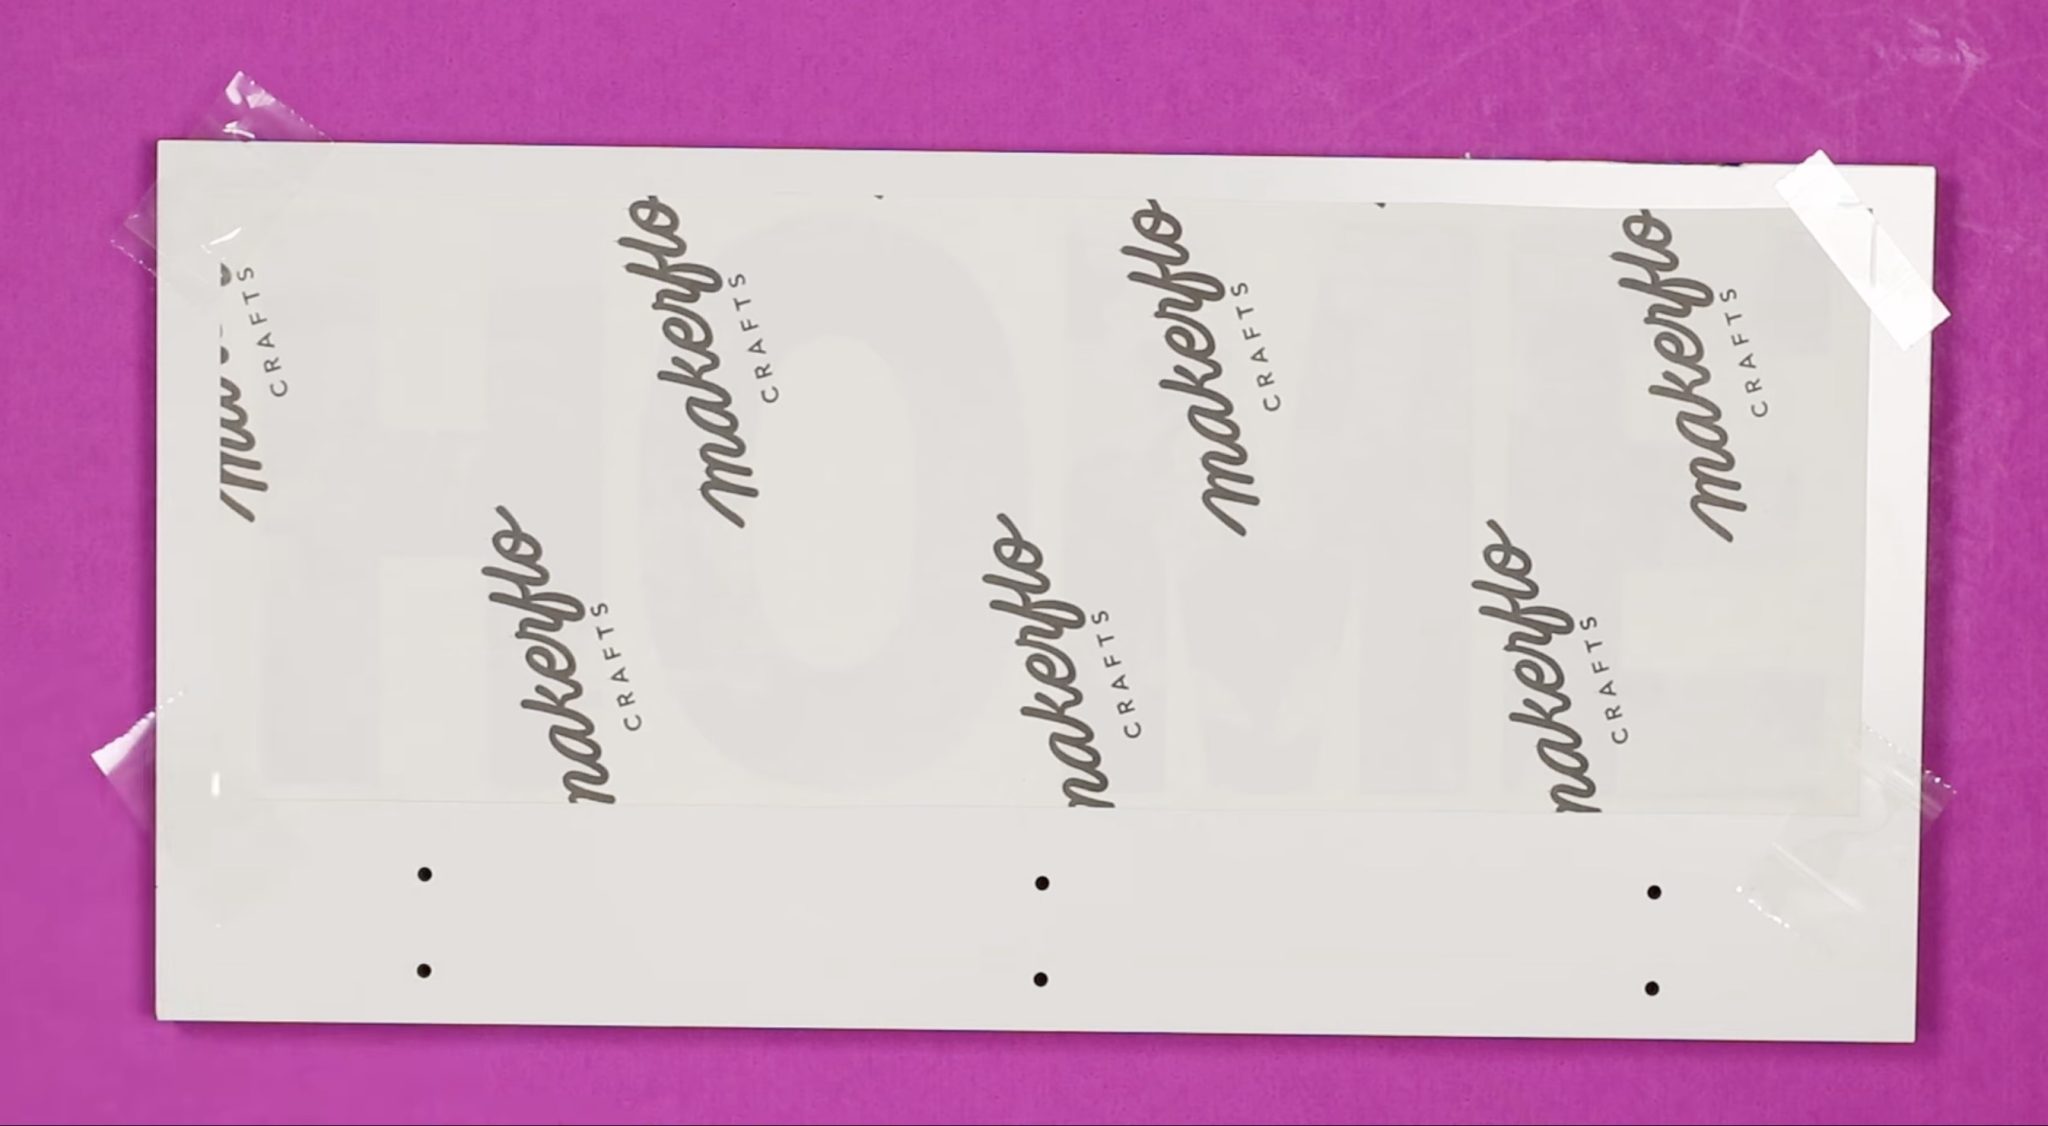
Step 4. Put together Clean
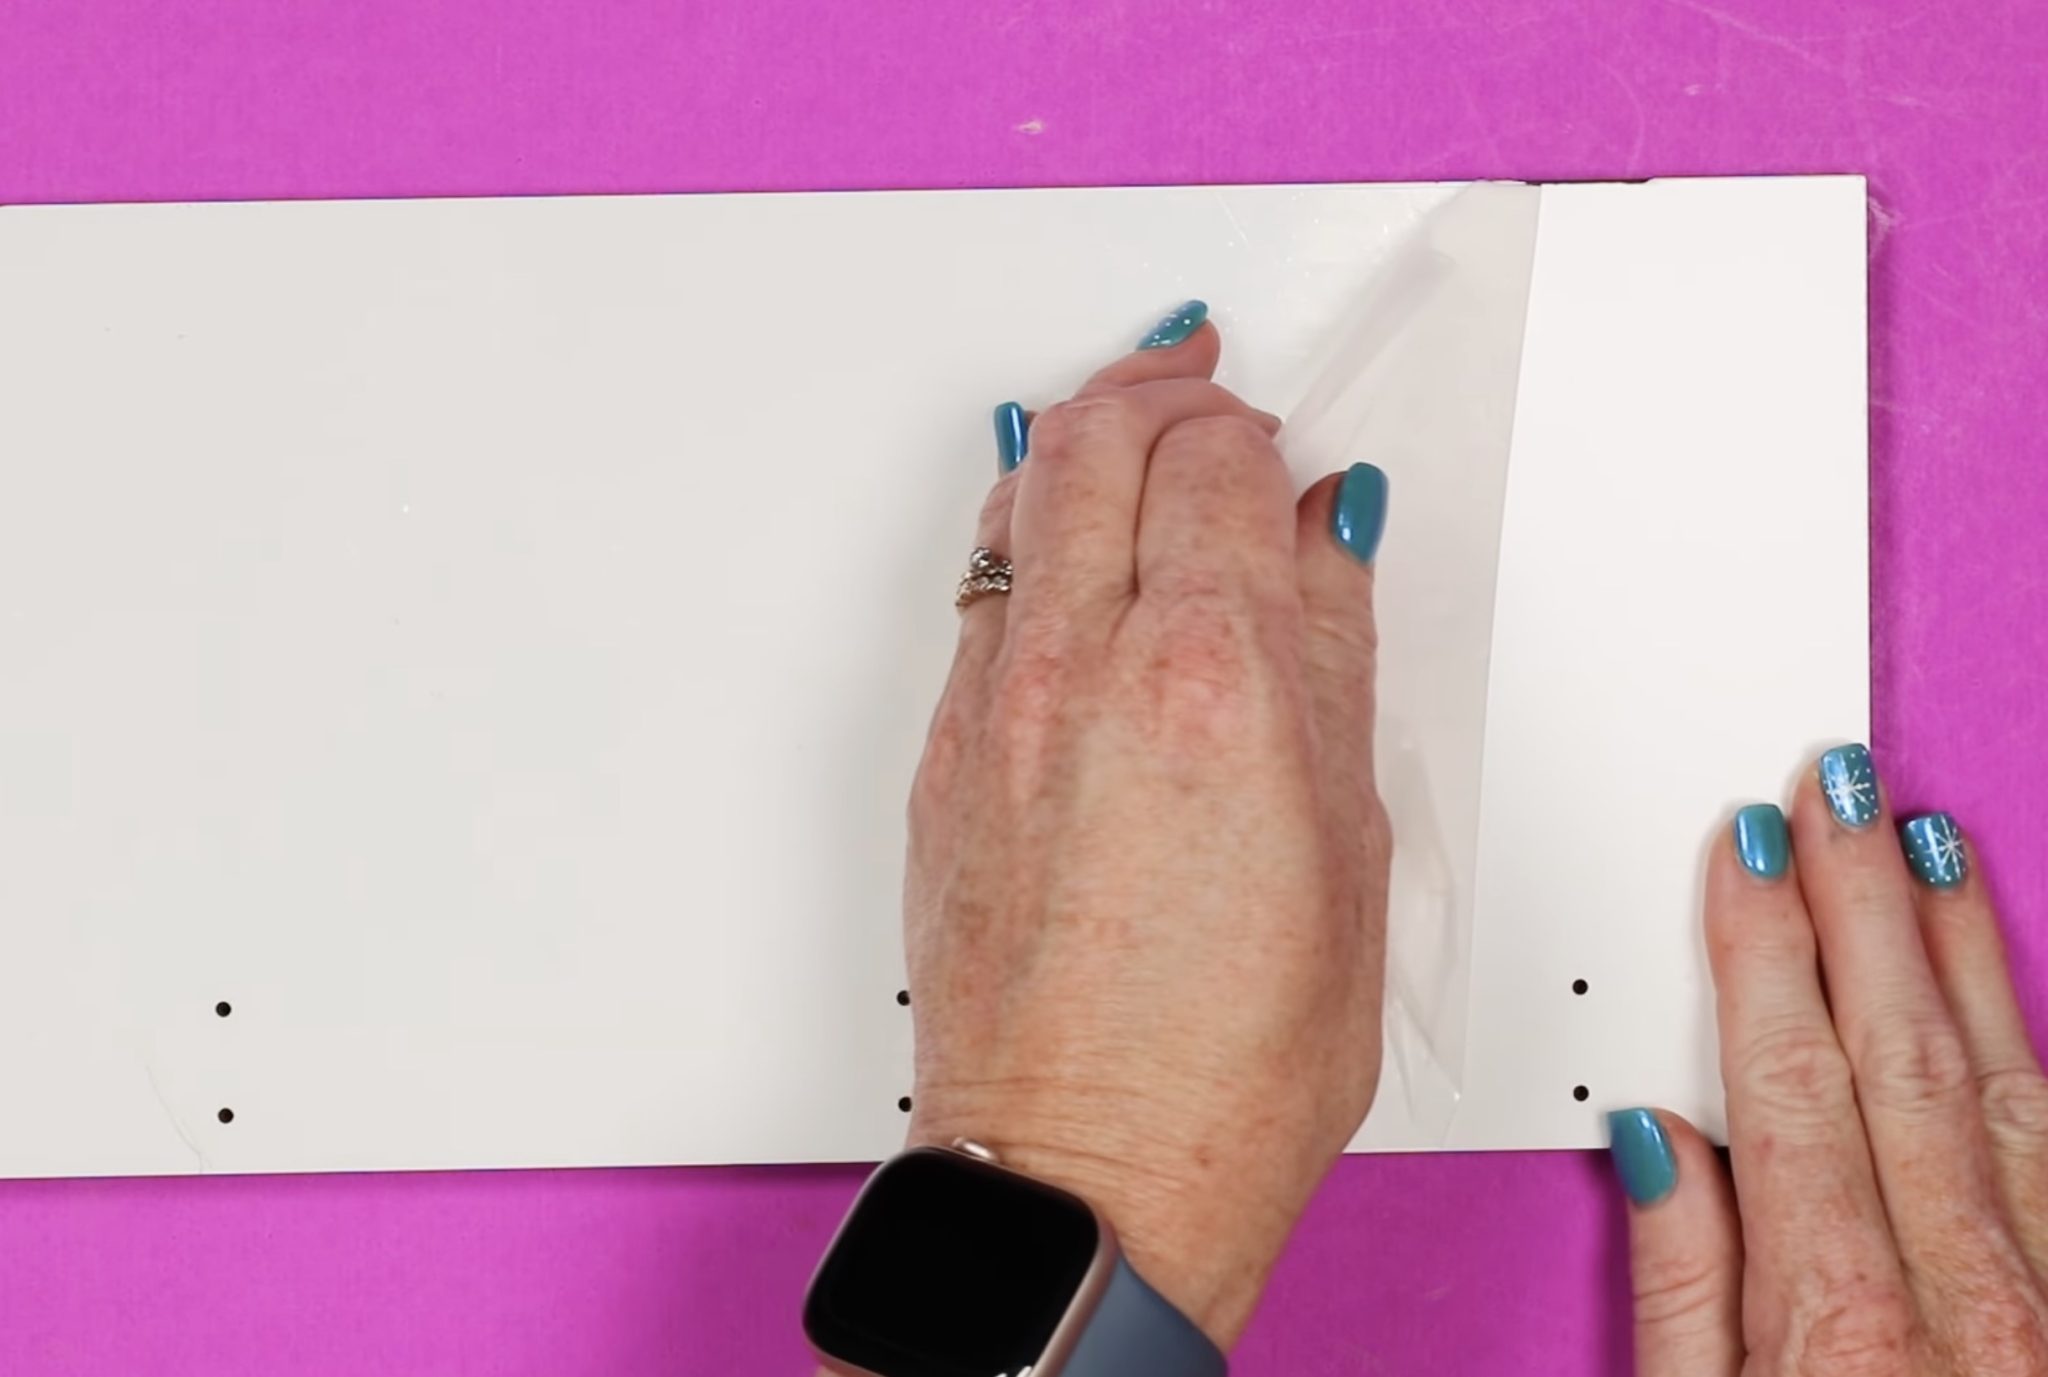
If you open the sublimation hanging organizer, it is going to have a protecting movie on the white facet of the print, and the hooks will not be hooked up.
Pin
Transfer the hooks to the facet and take away the protecting movie. In case your organizer seems scratched or soiled while you first open it, that’s possible due to the protecting movie.
Pin
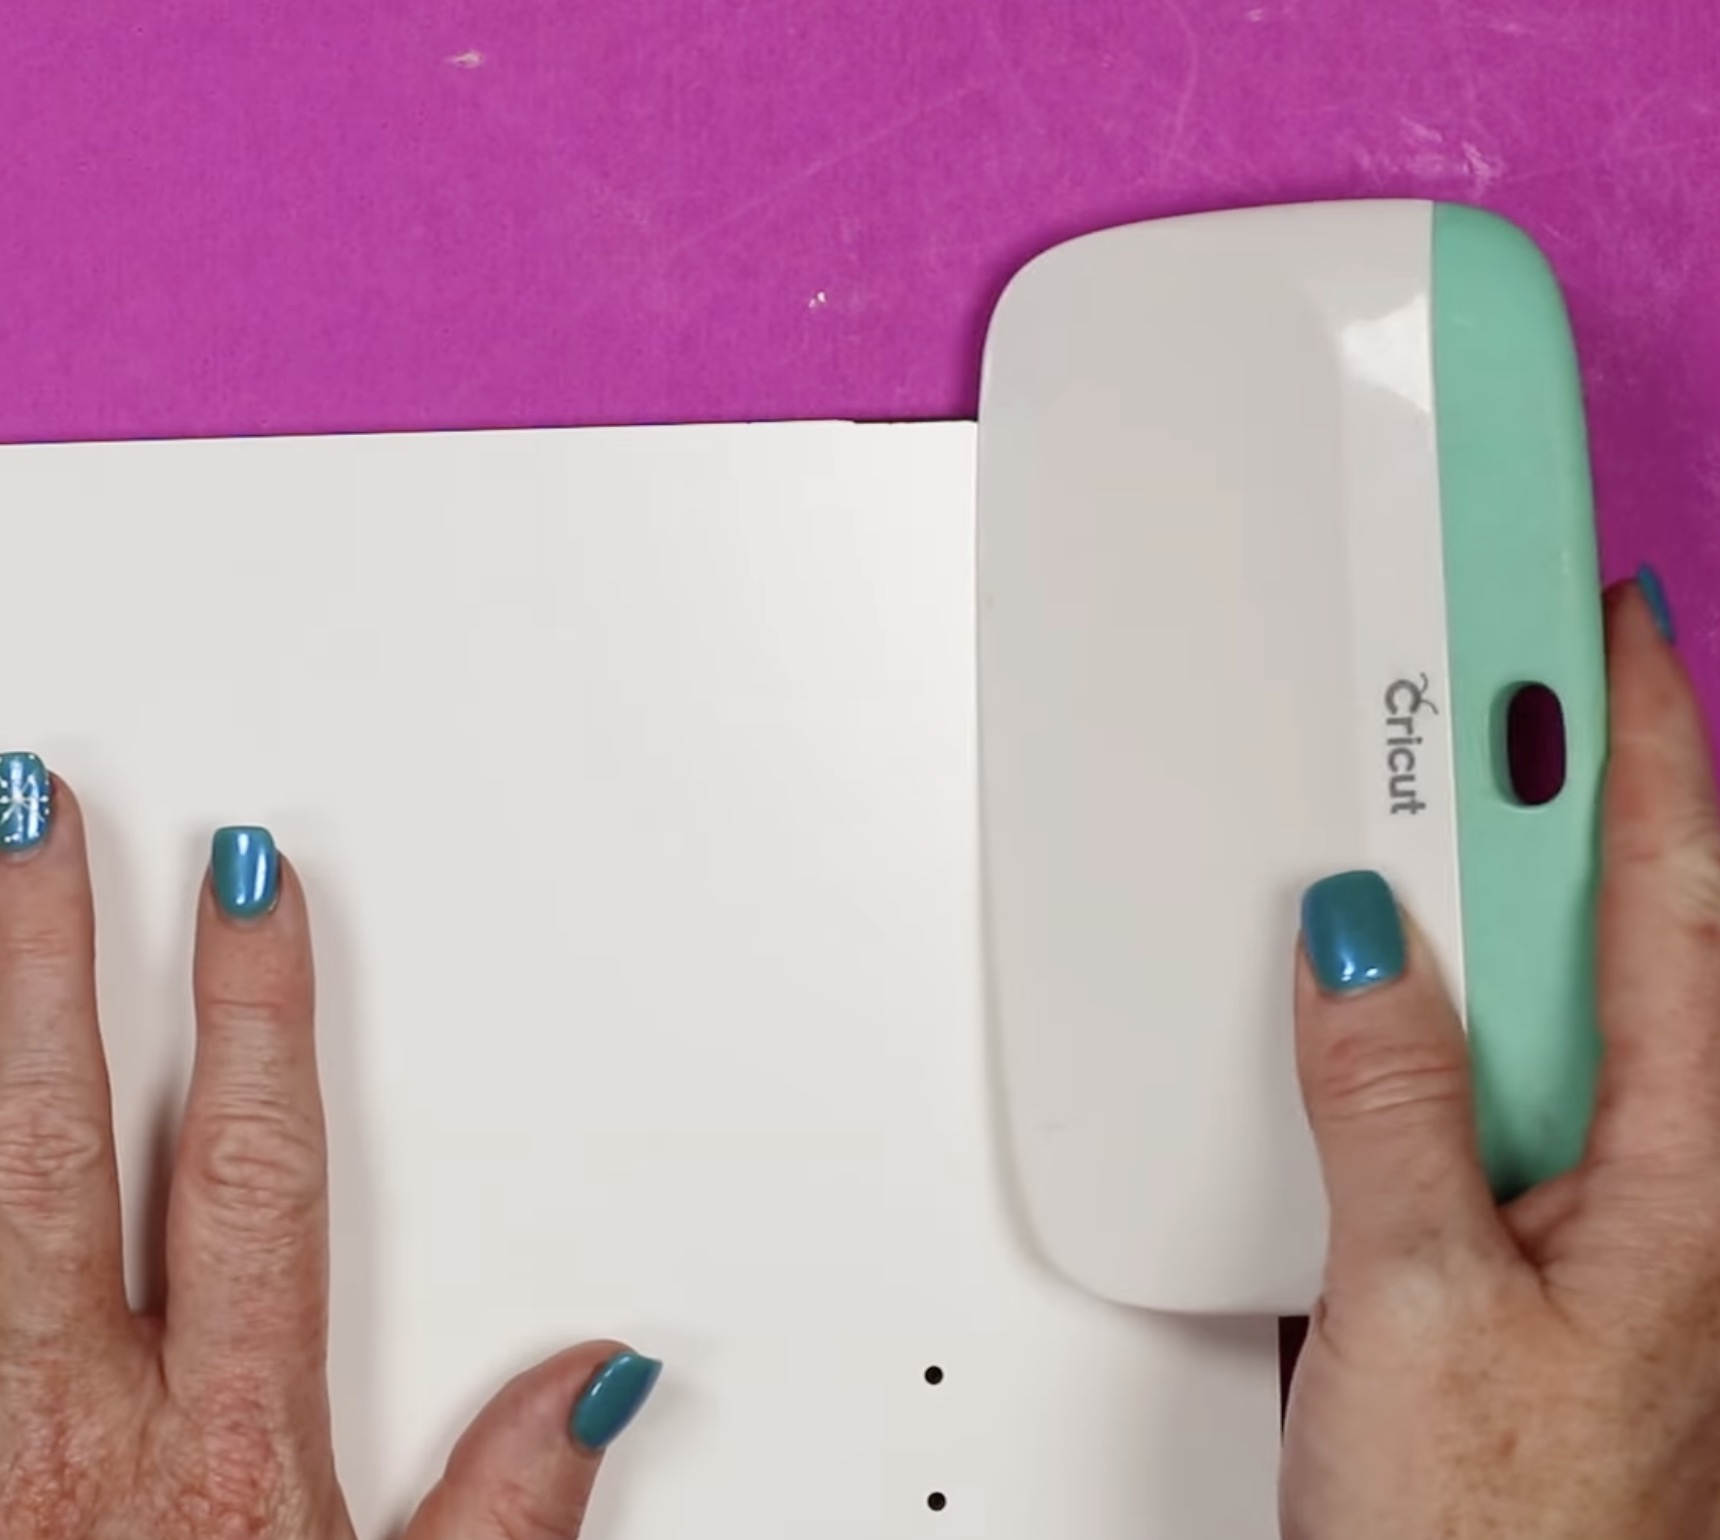
With the movie eliminated, verify all the sides of your signal. Generally there may be a little black from the sides that comes over onto the entrance. If there may be any, use one thing like a scraper instrument to clear it off after which lint roll the floor to take away any mud or particles.
Pin
Step 5. Add Sublimation Print
Now, we’re prepared to apply the print.
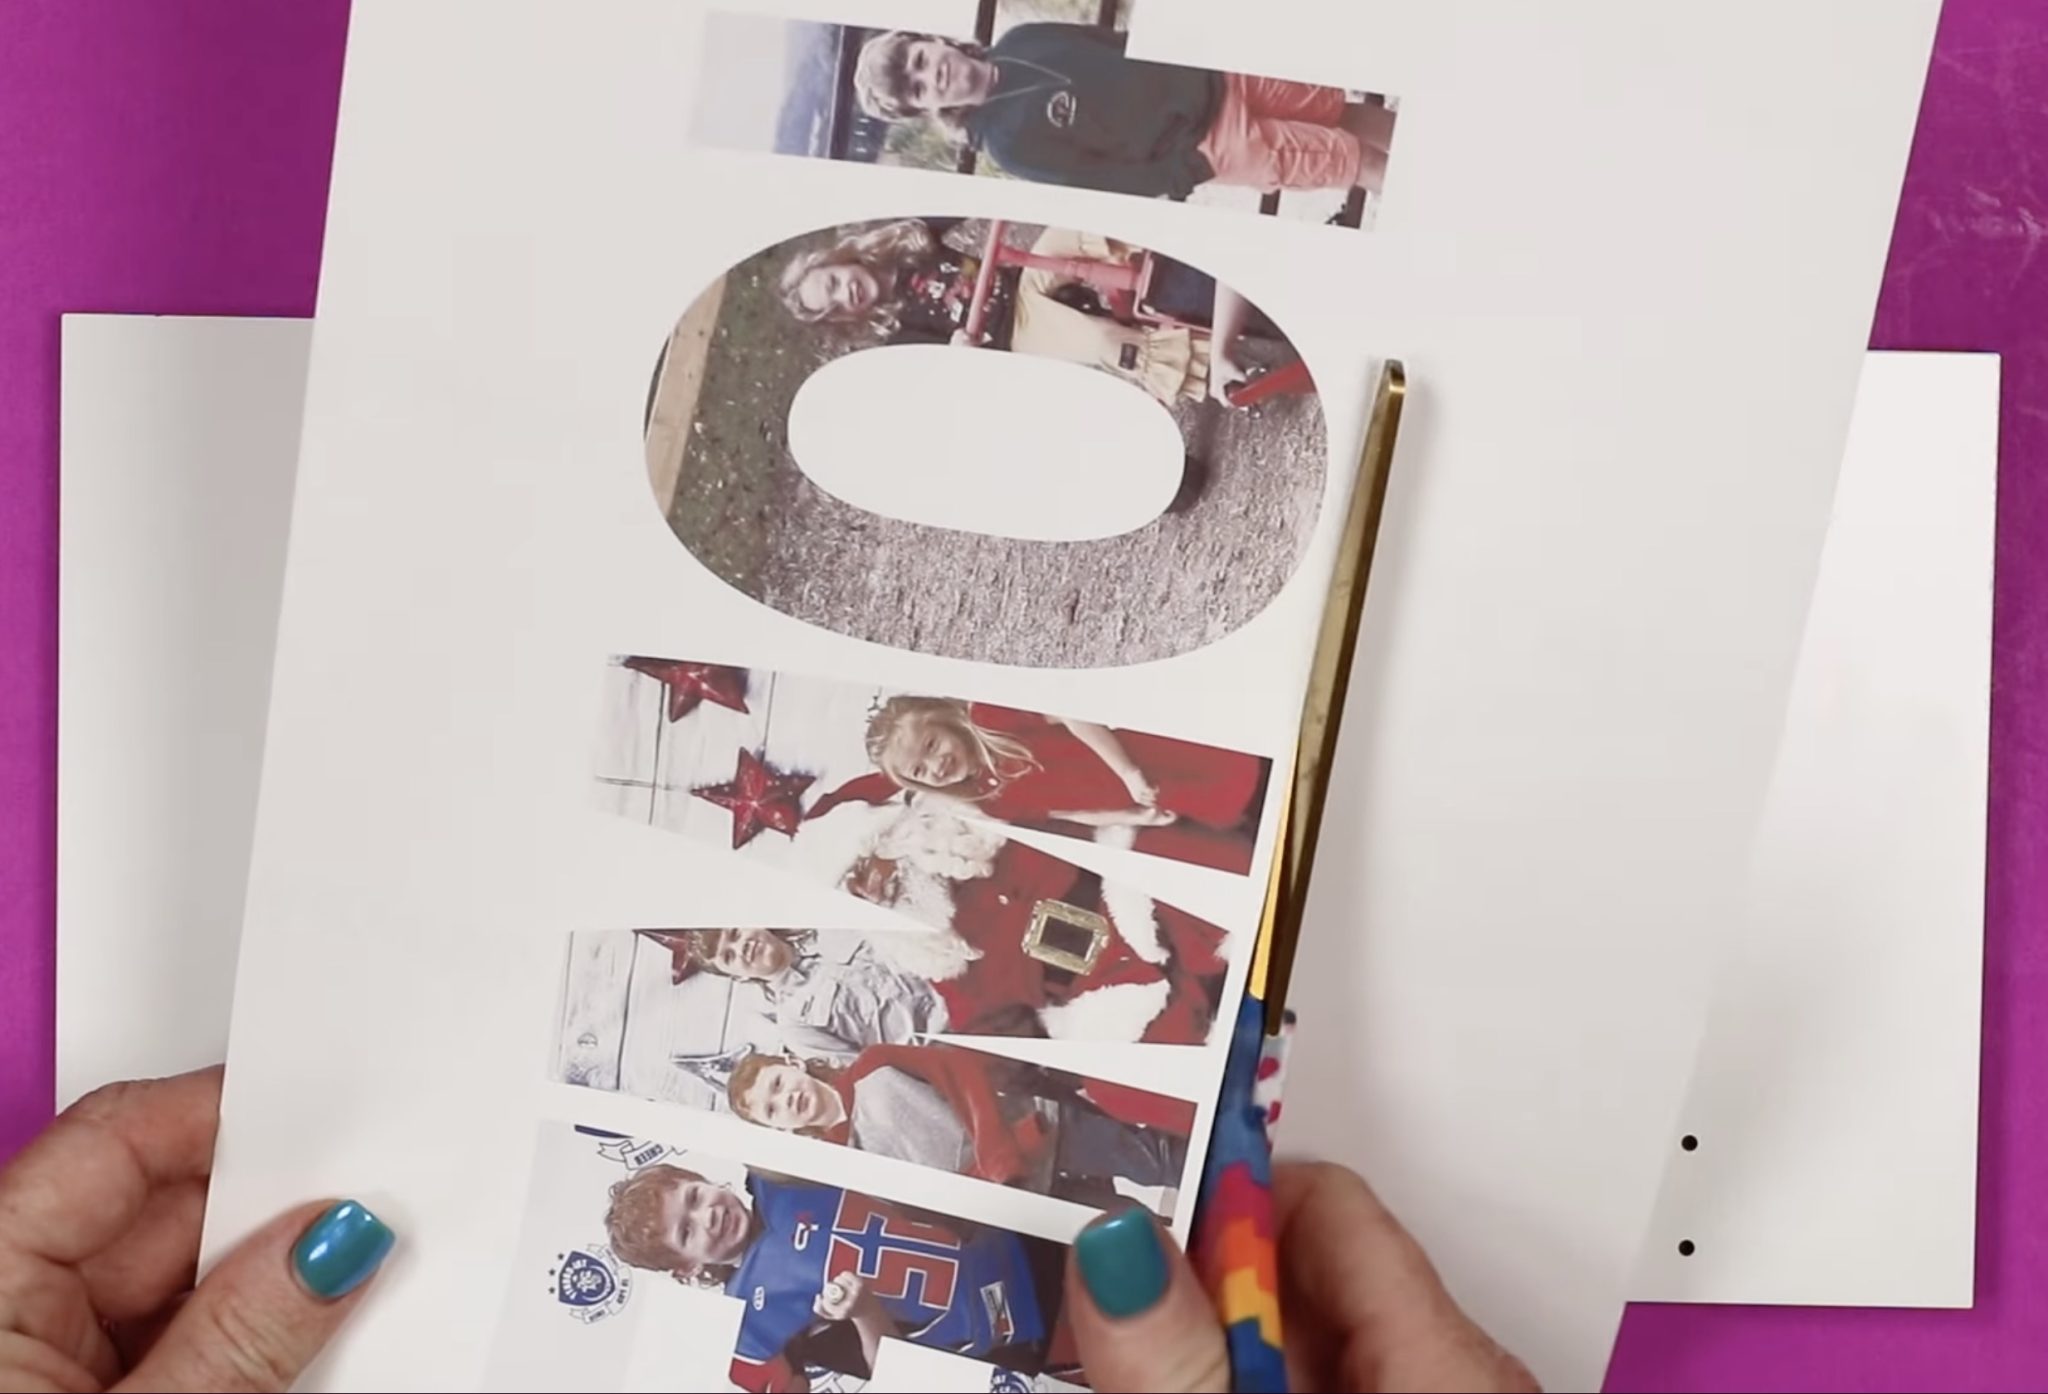
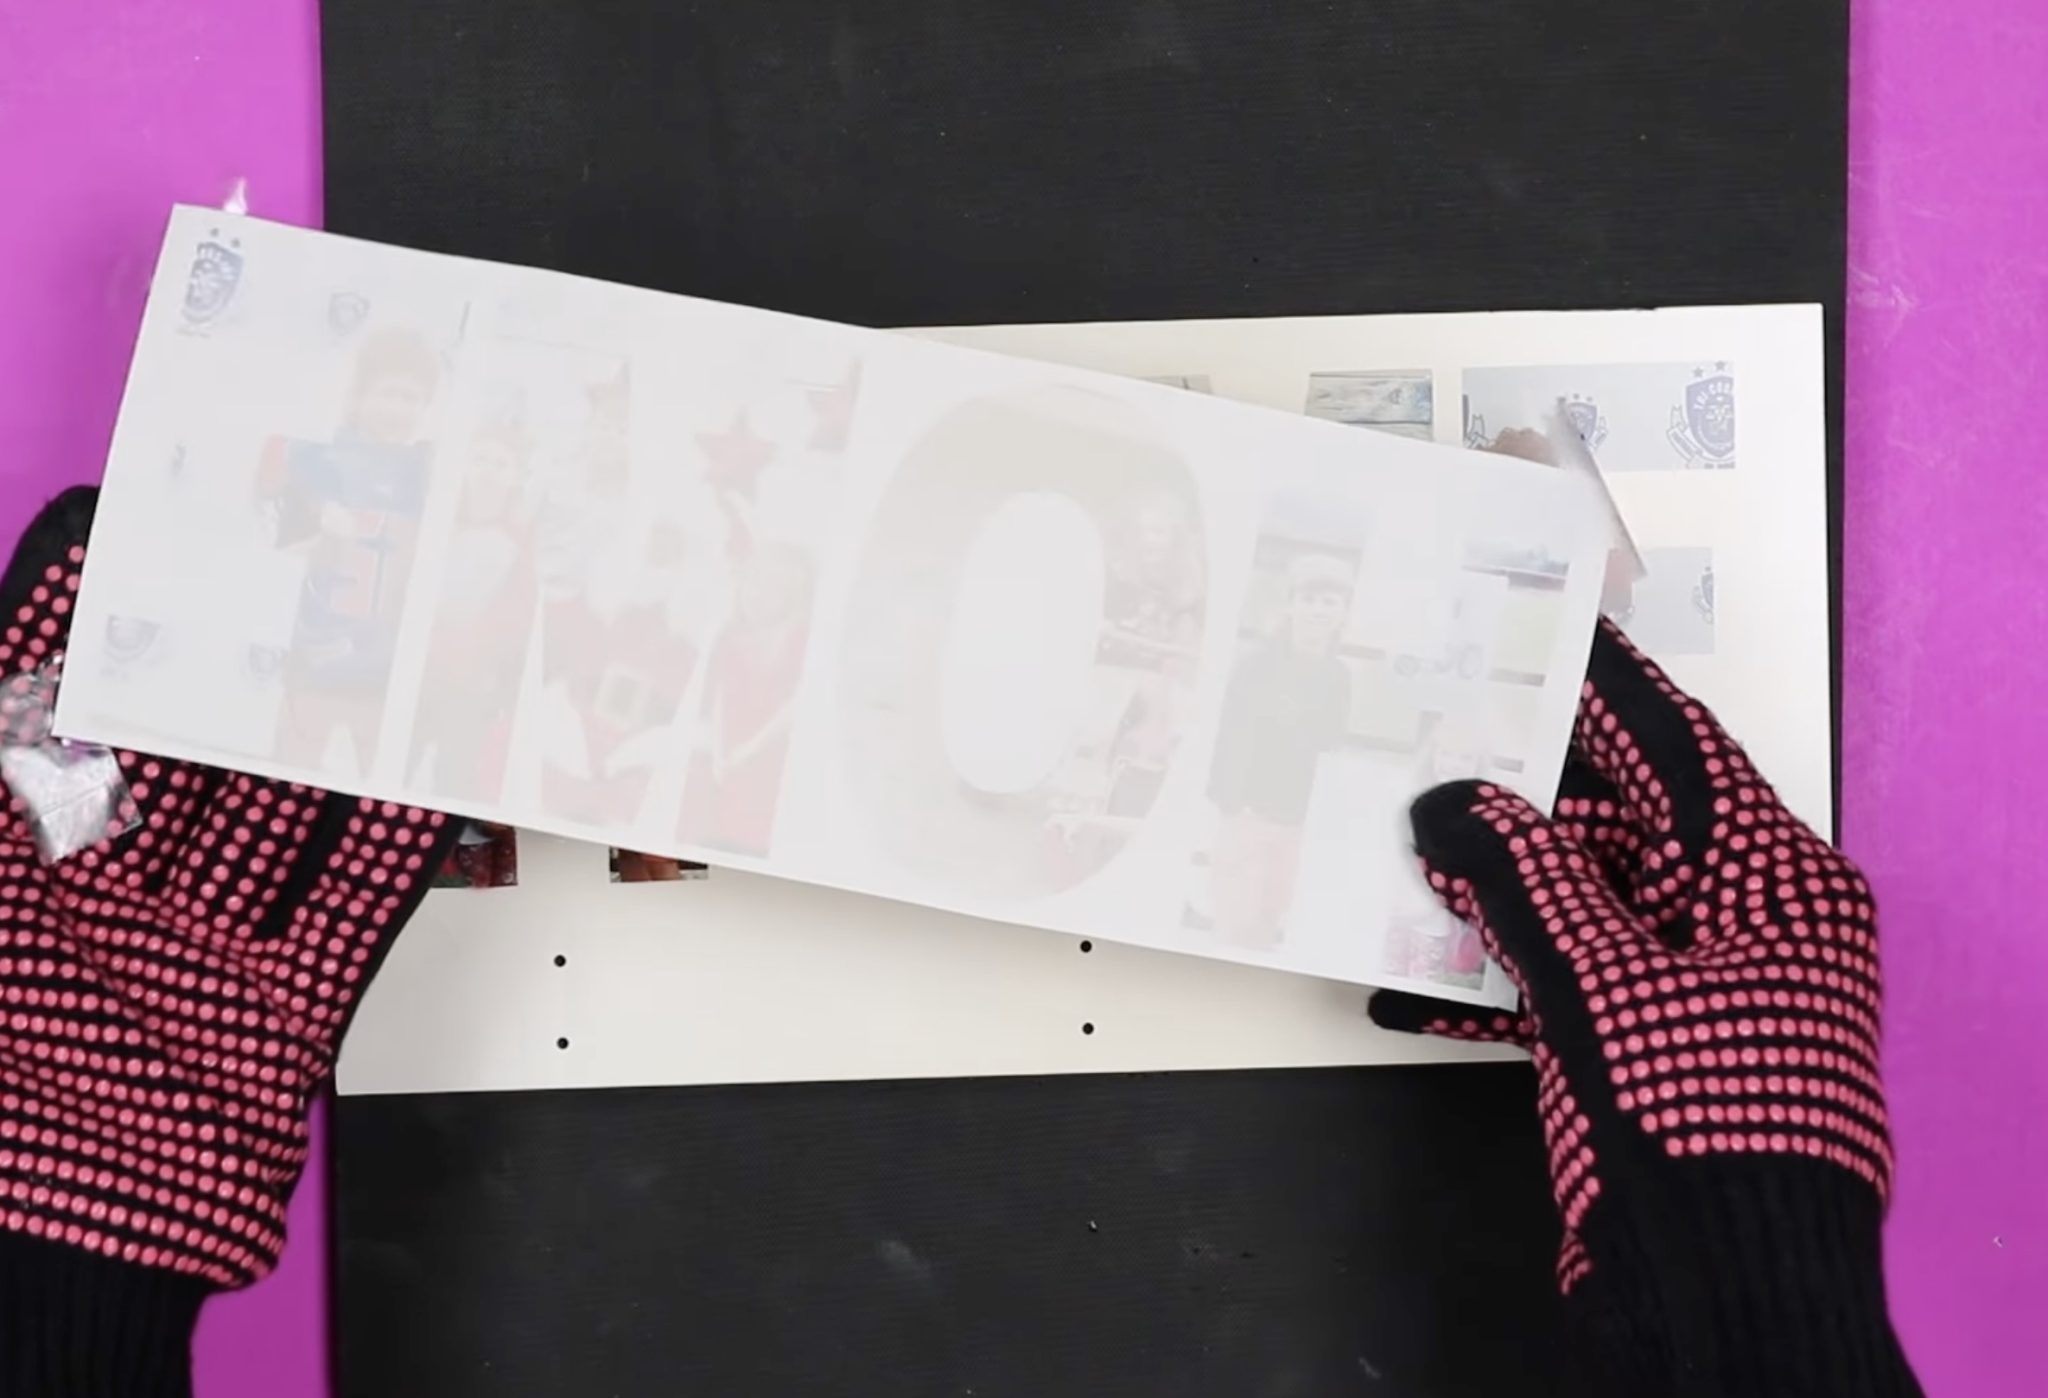
Due to the scale of my design, to start, I’m going to trim the print shut to the design. This may make it simpler for me to find the design precisely the place I need it.
Pin
Be aware – concentrate to the holes for the hooks. Except you are doing a full design, you may need to increase the design a little above these holes as a result of the highest of the hook is a little increased than the opening.
Pin
With the design positioned, safe it in place with heat-resistant tape.
Pin
Step 6. Press the Design
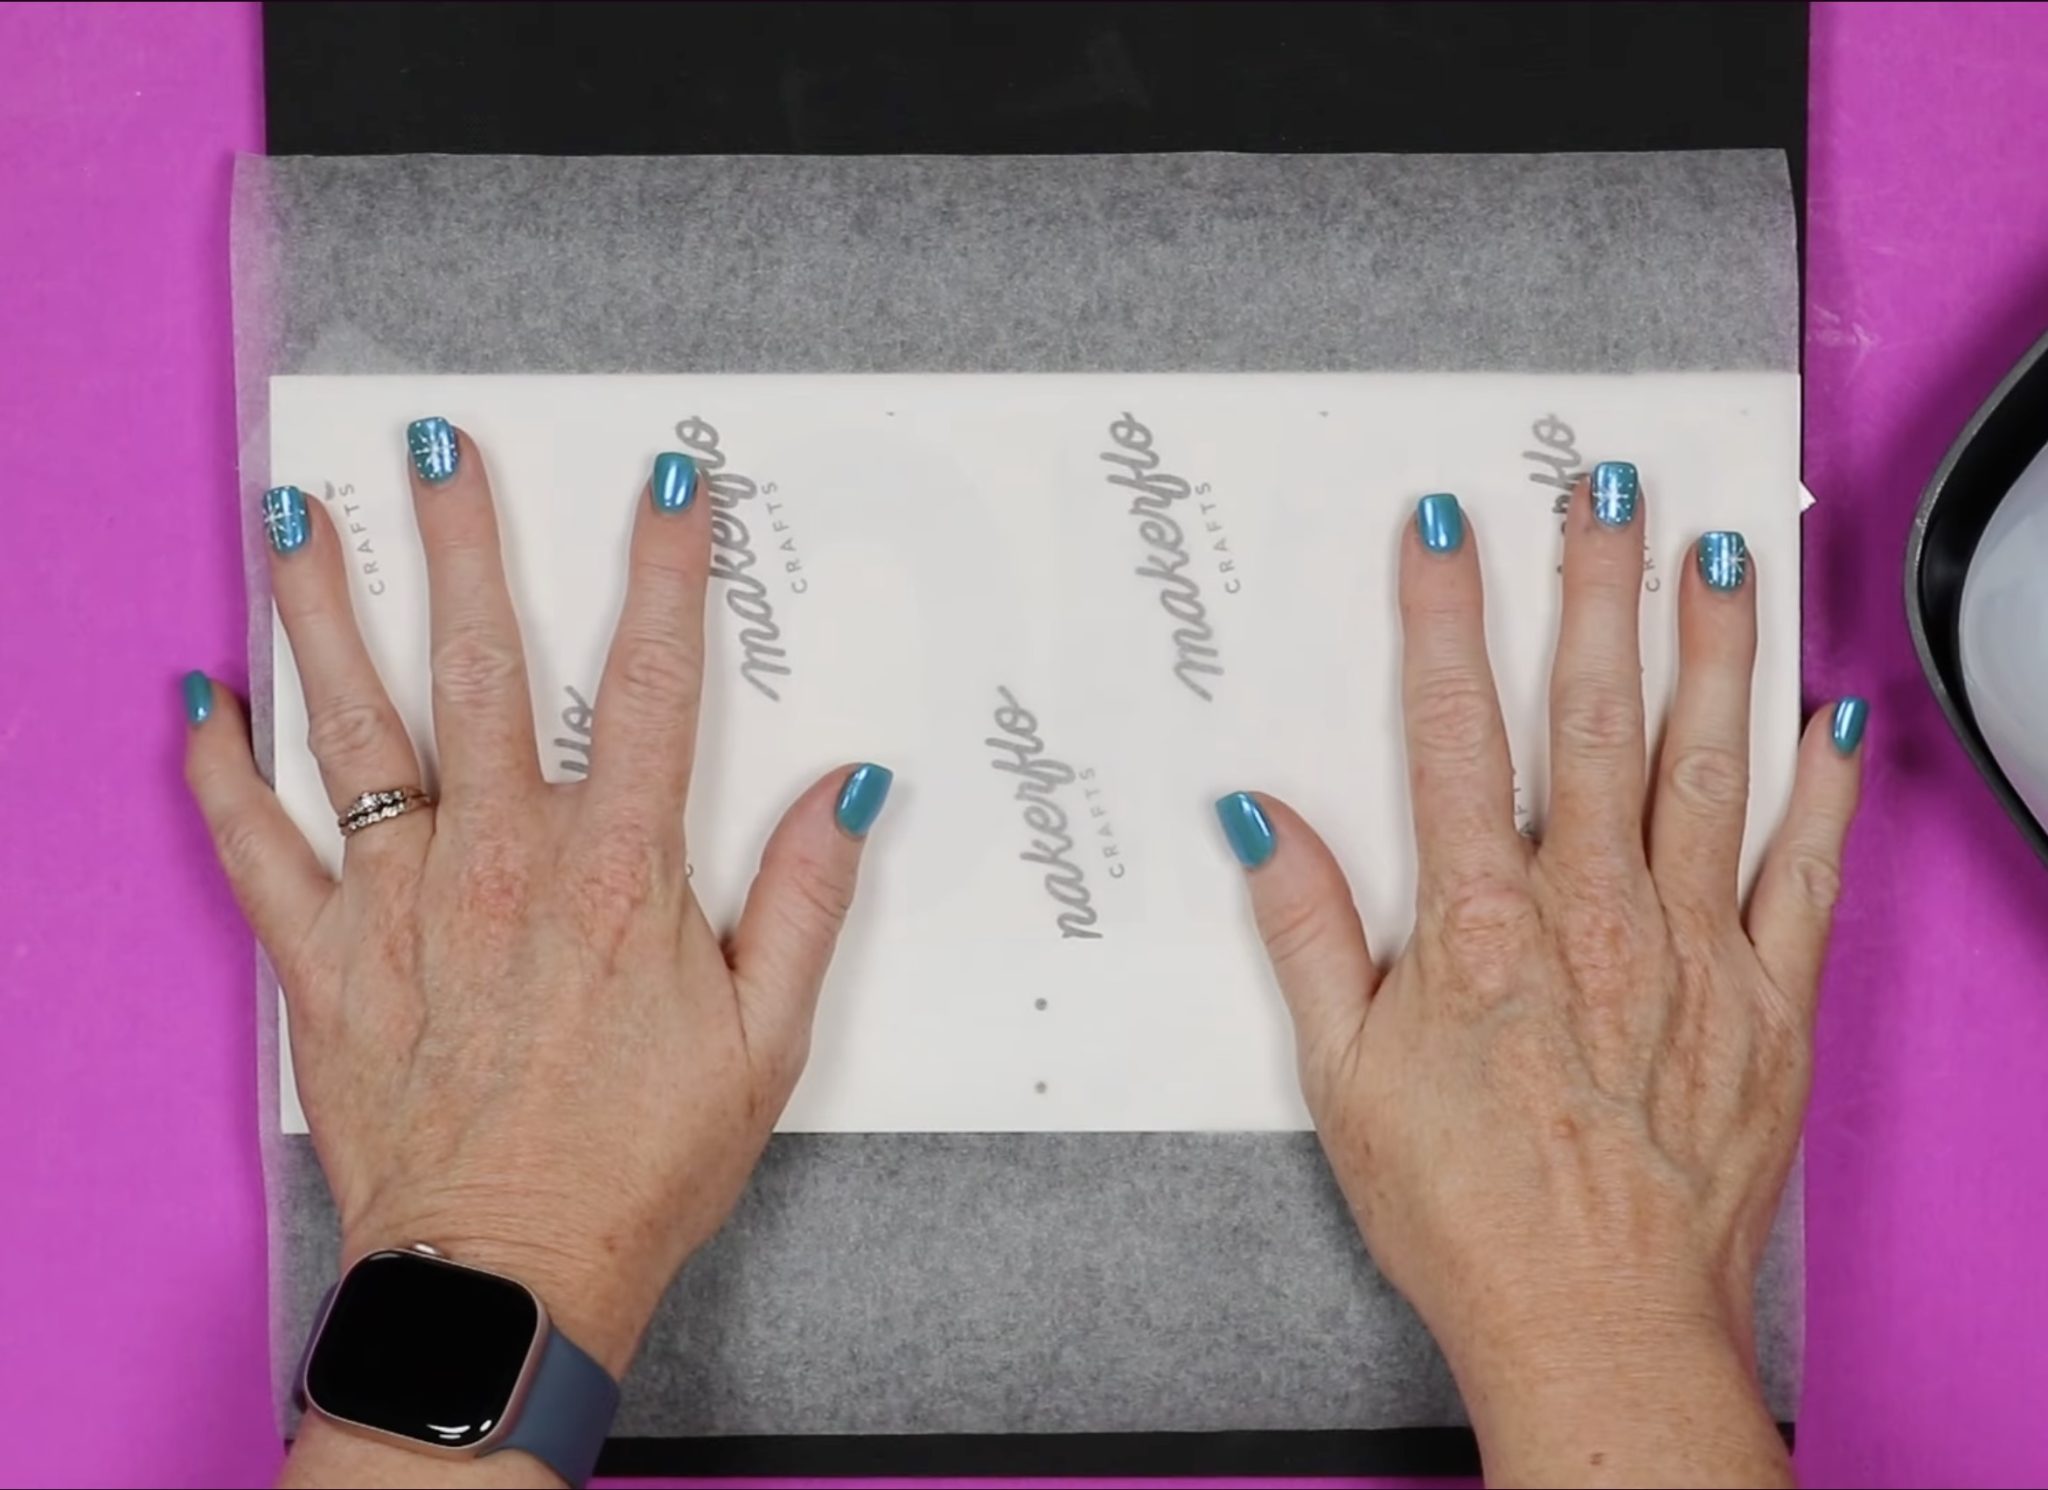
Place the sublimation hanging organizer on a heat-resistant mat and canopy the design with protecting paper.
Pin
I’m utilizing my 10-inch by 12-inch EasyPress 3 as a result of it is going to cowl the complete design. Preheat the press to 400 levels and set the timer to 90 seconds.
Pin
Place the EasyPress on the print, ensuring to cowl the complete print. Apply medium stress for the complete time.
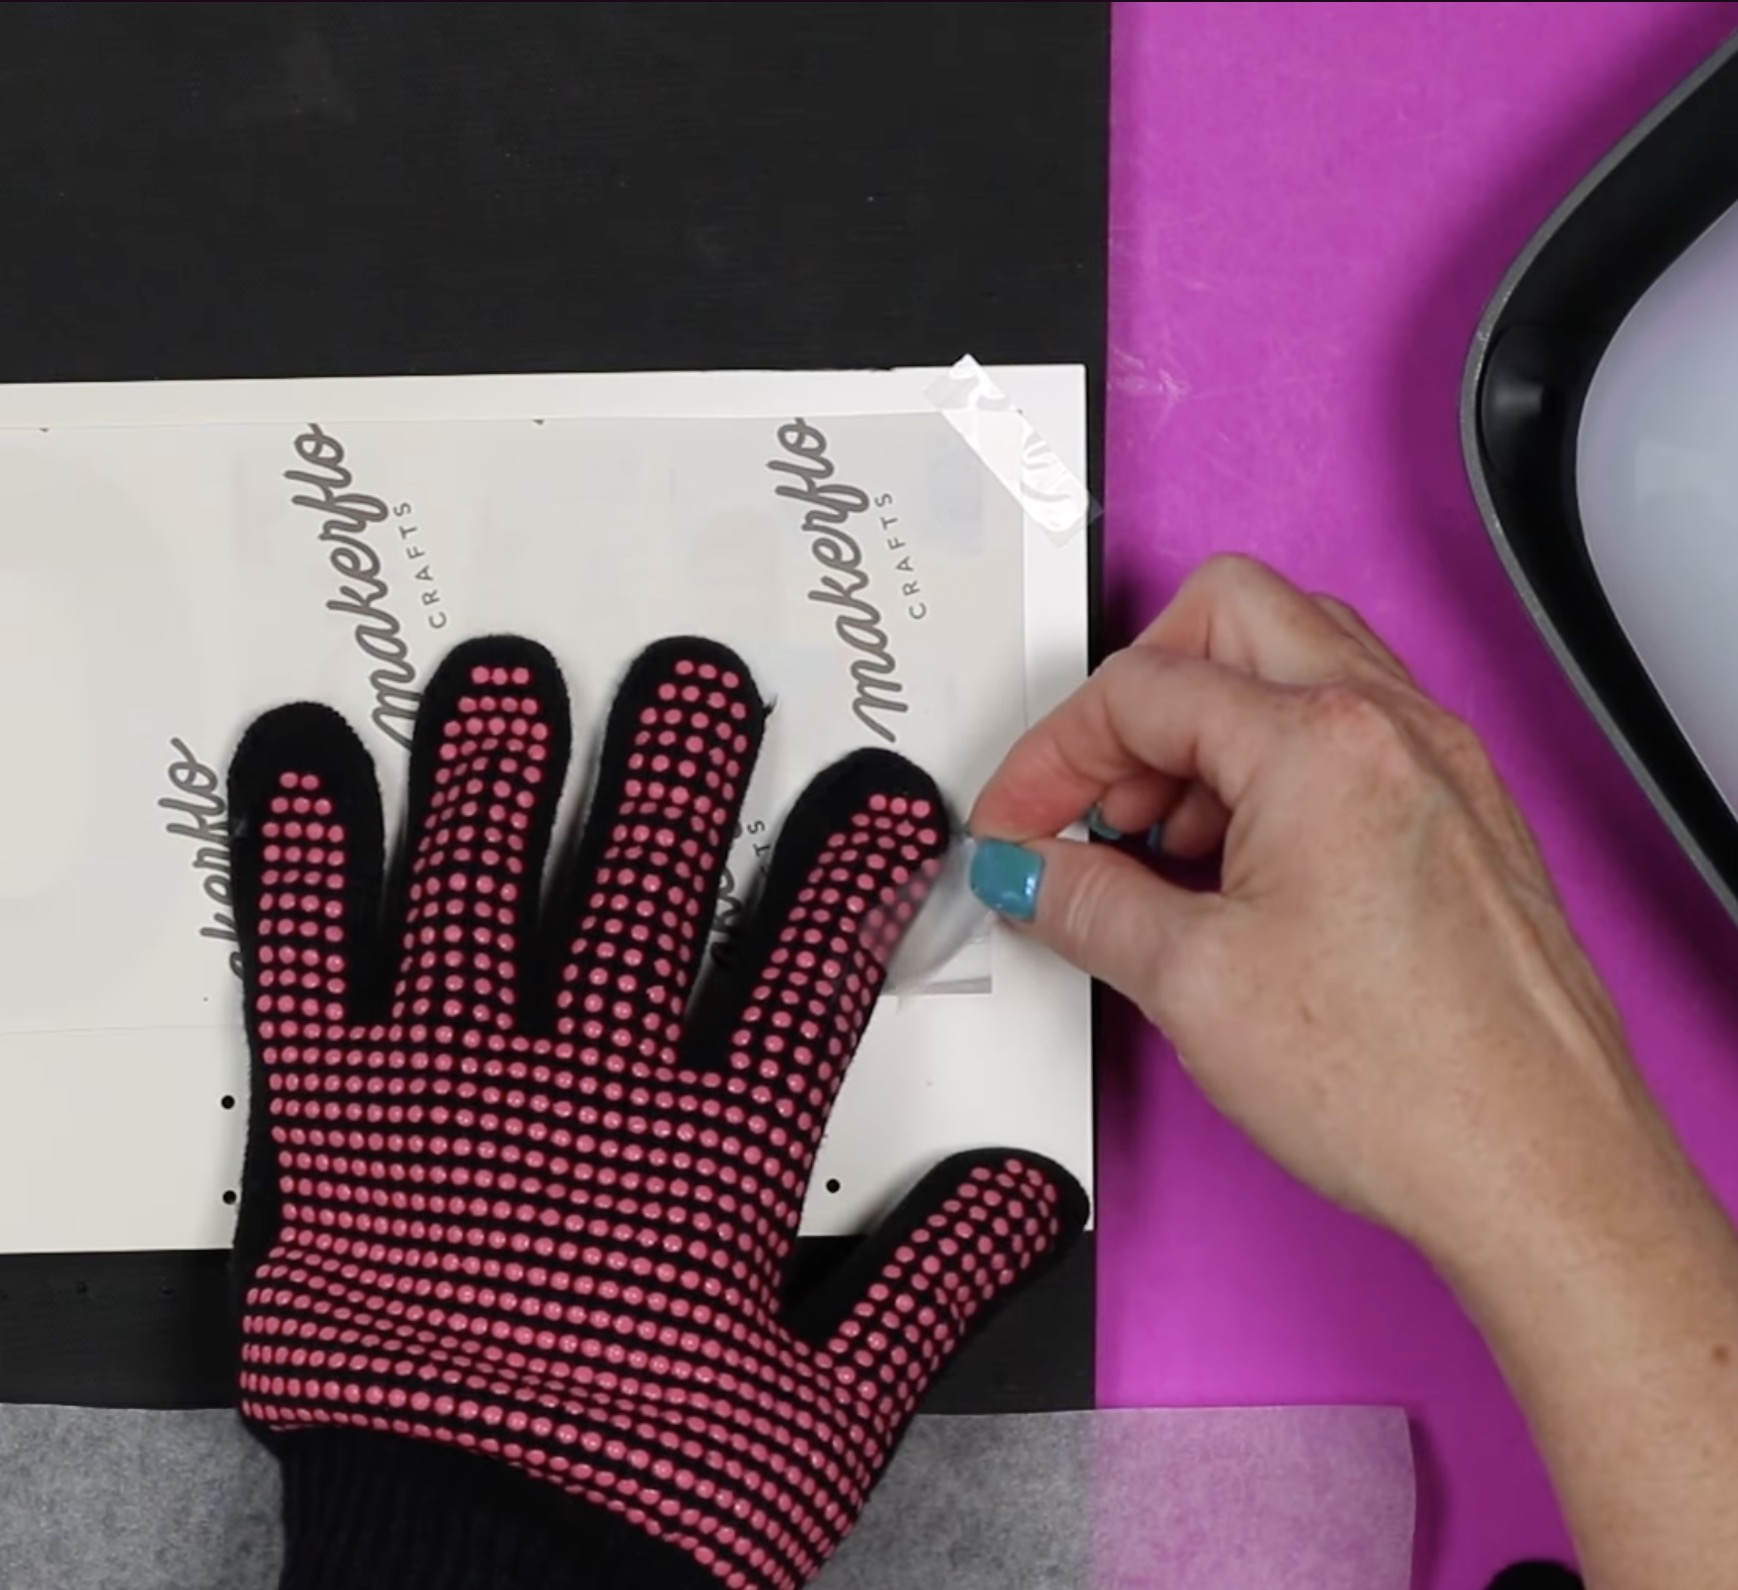
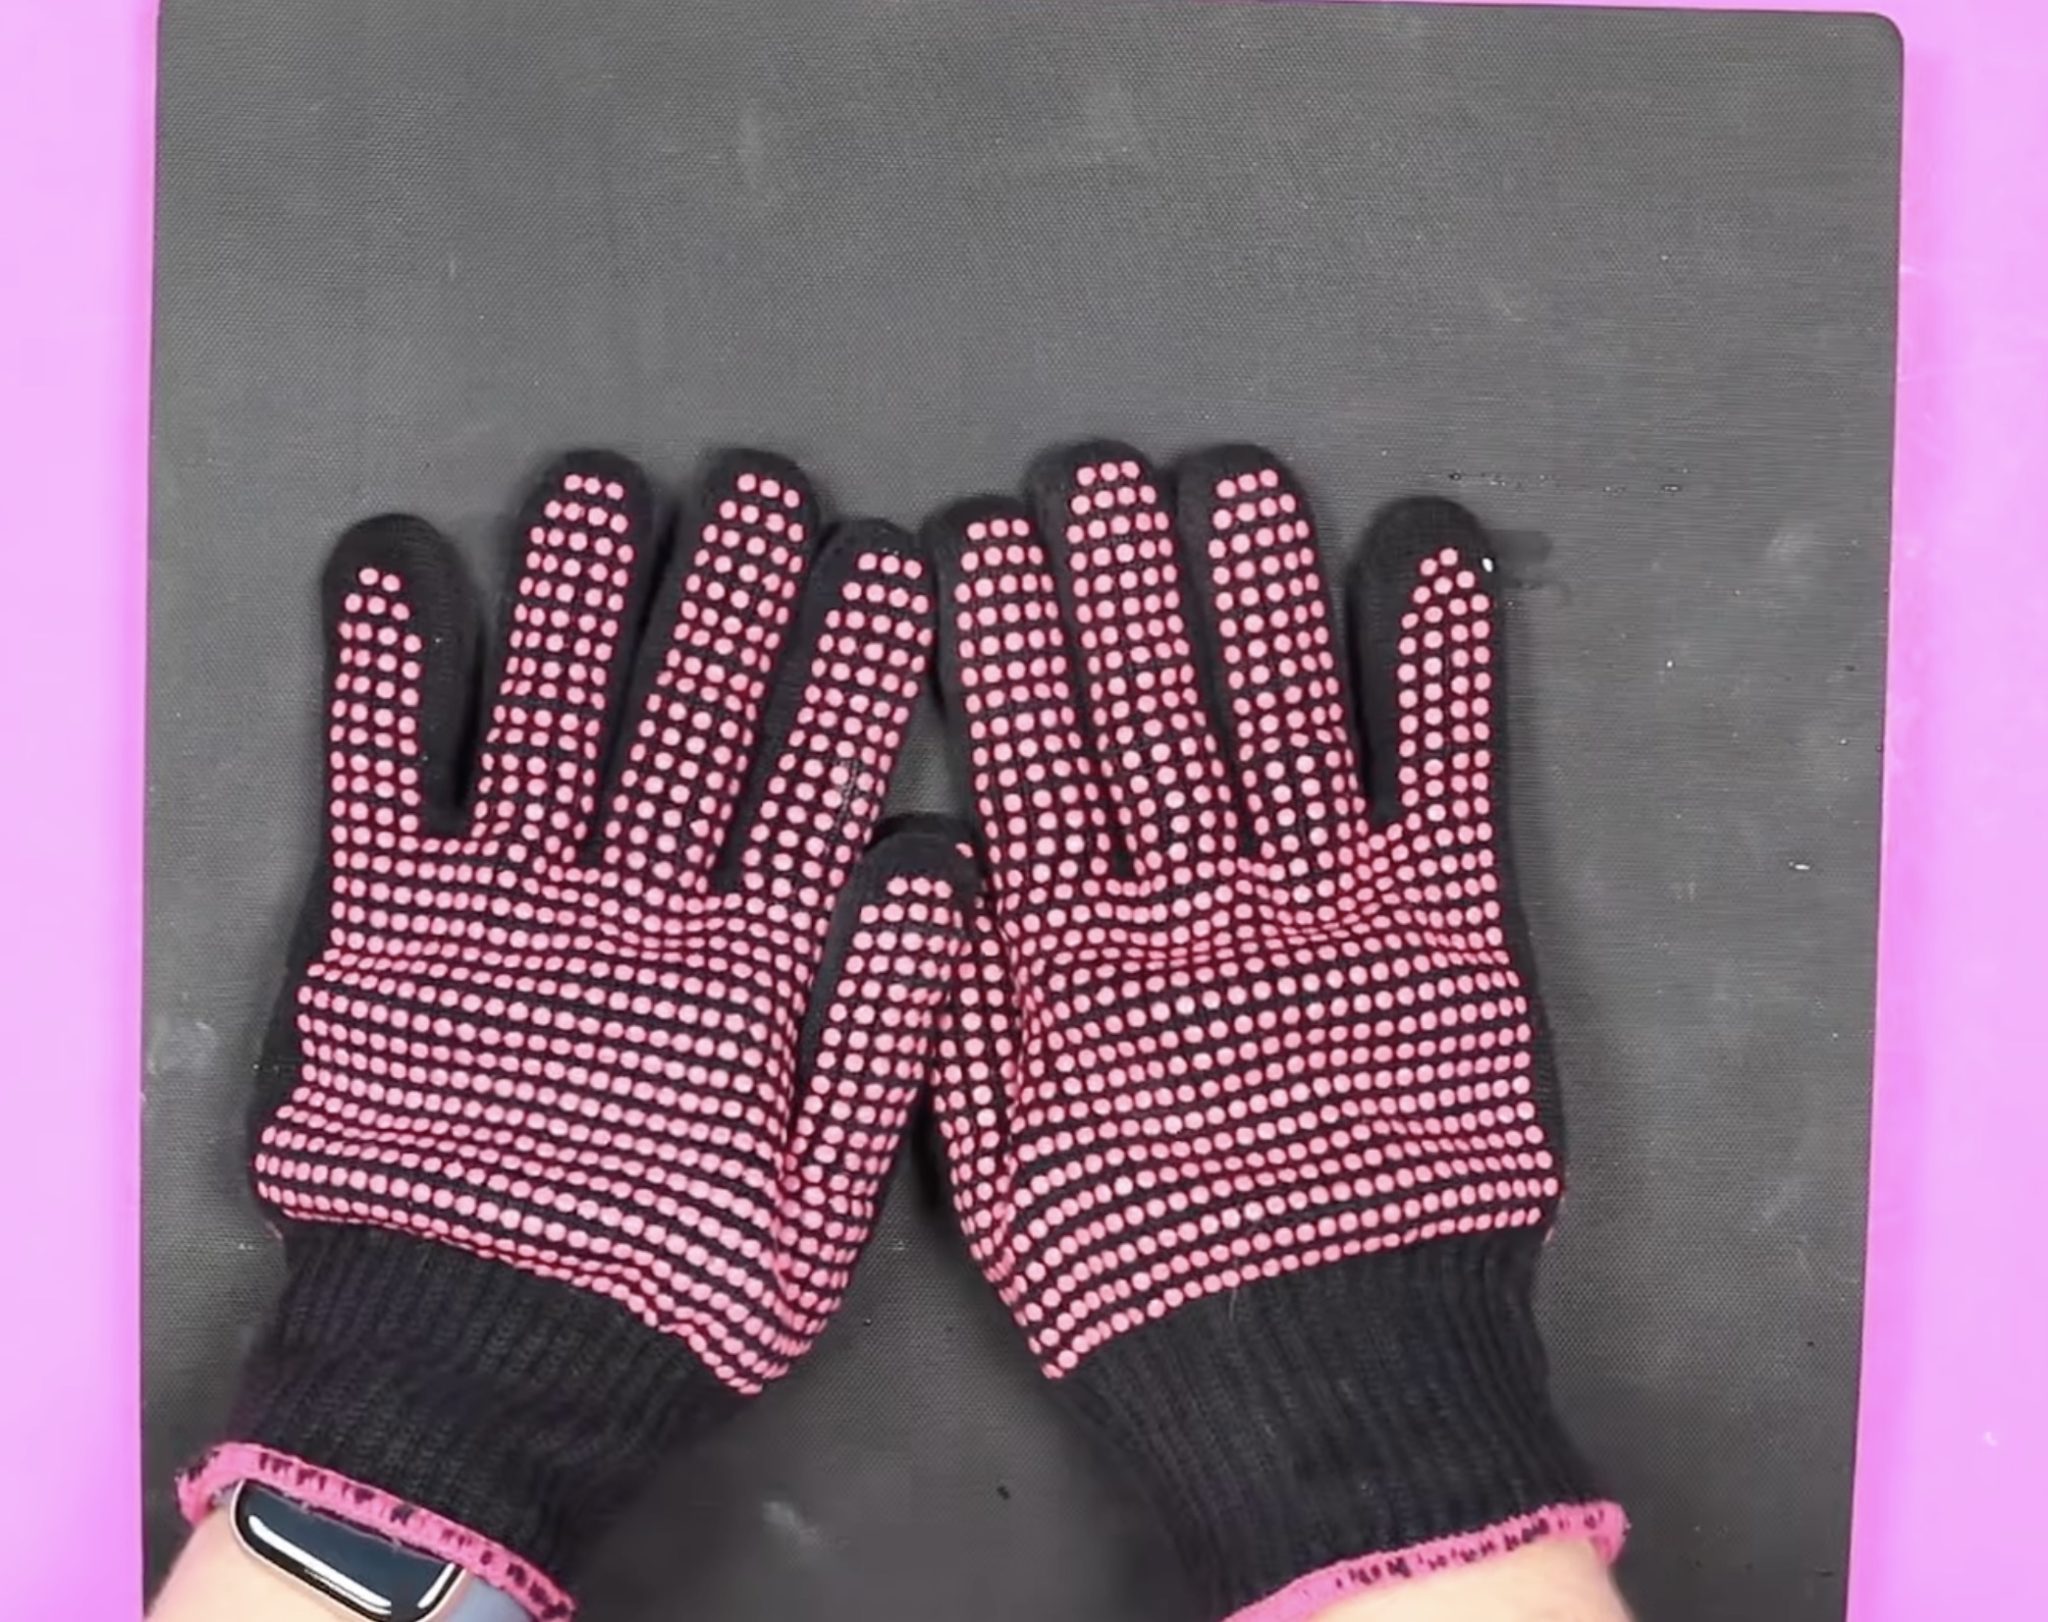
Step 7. Take away Sublimation Print
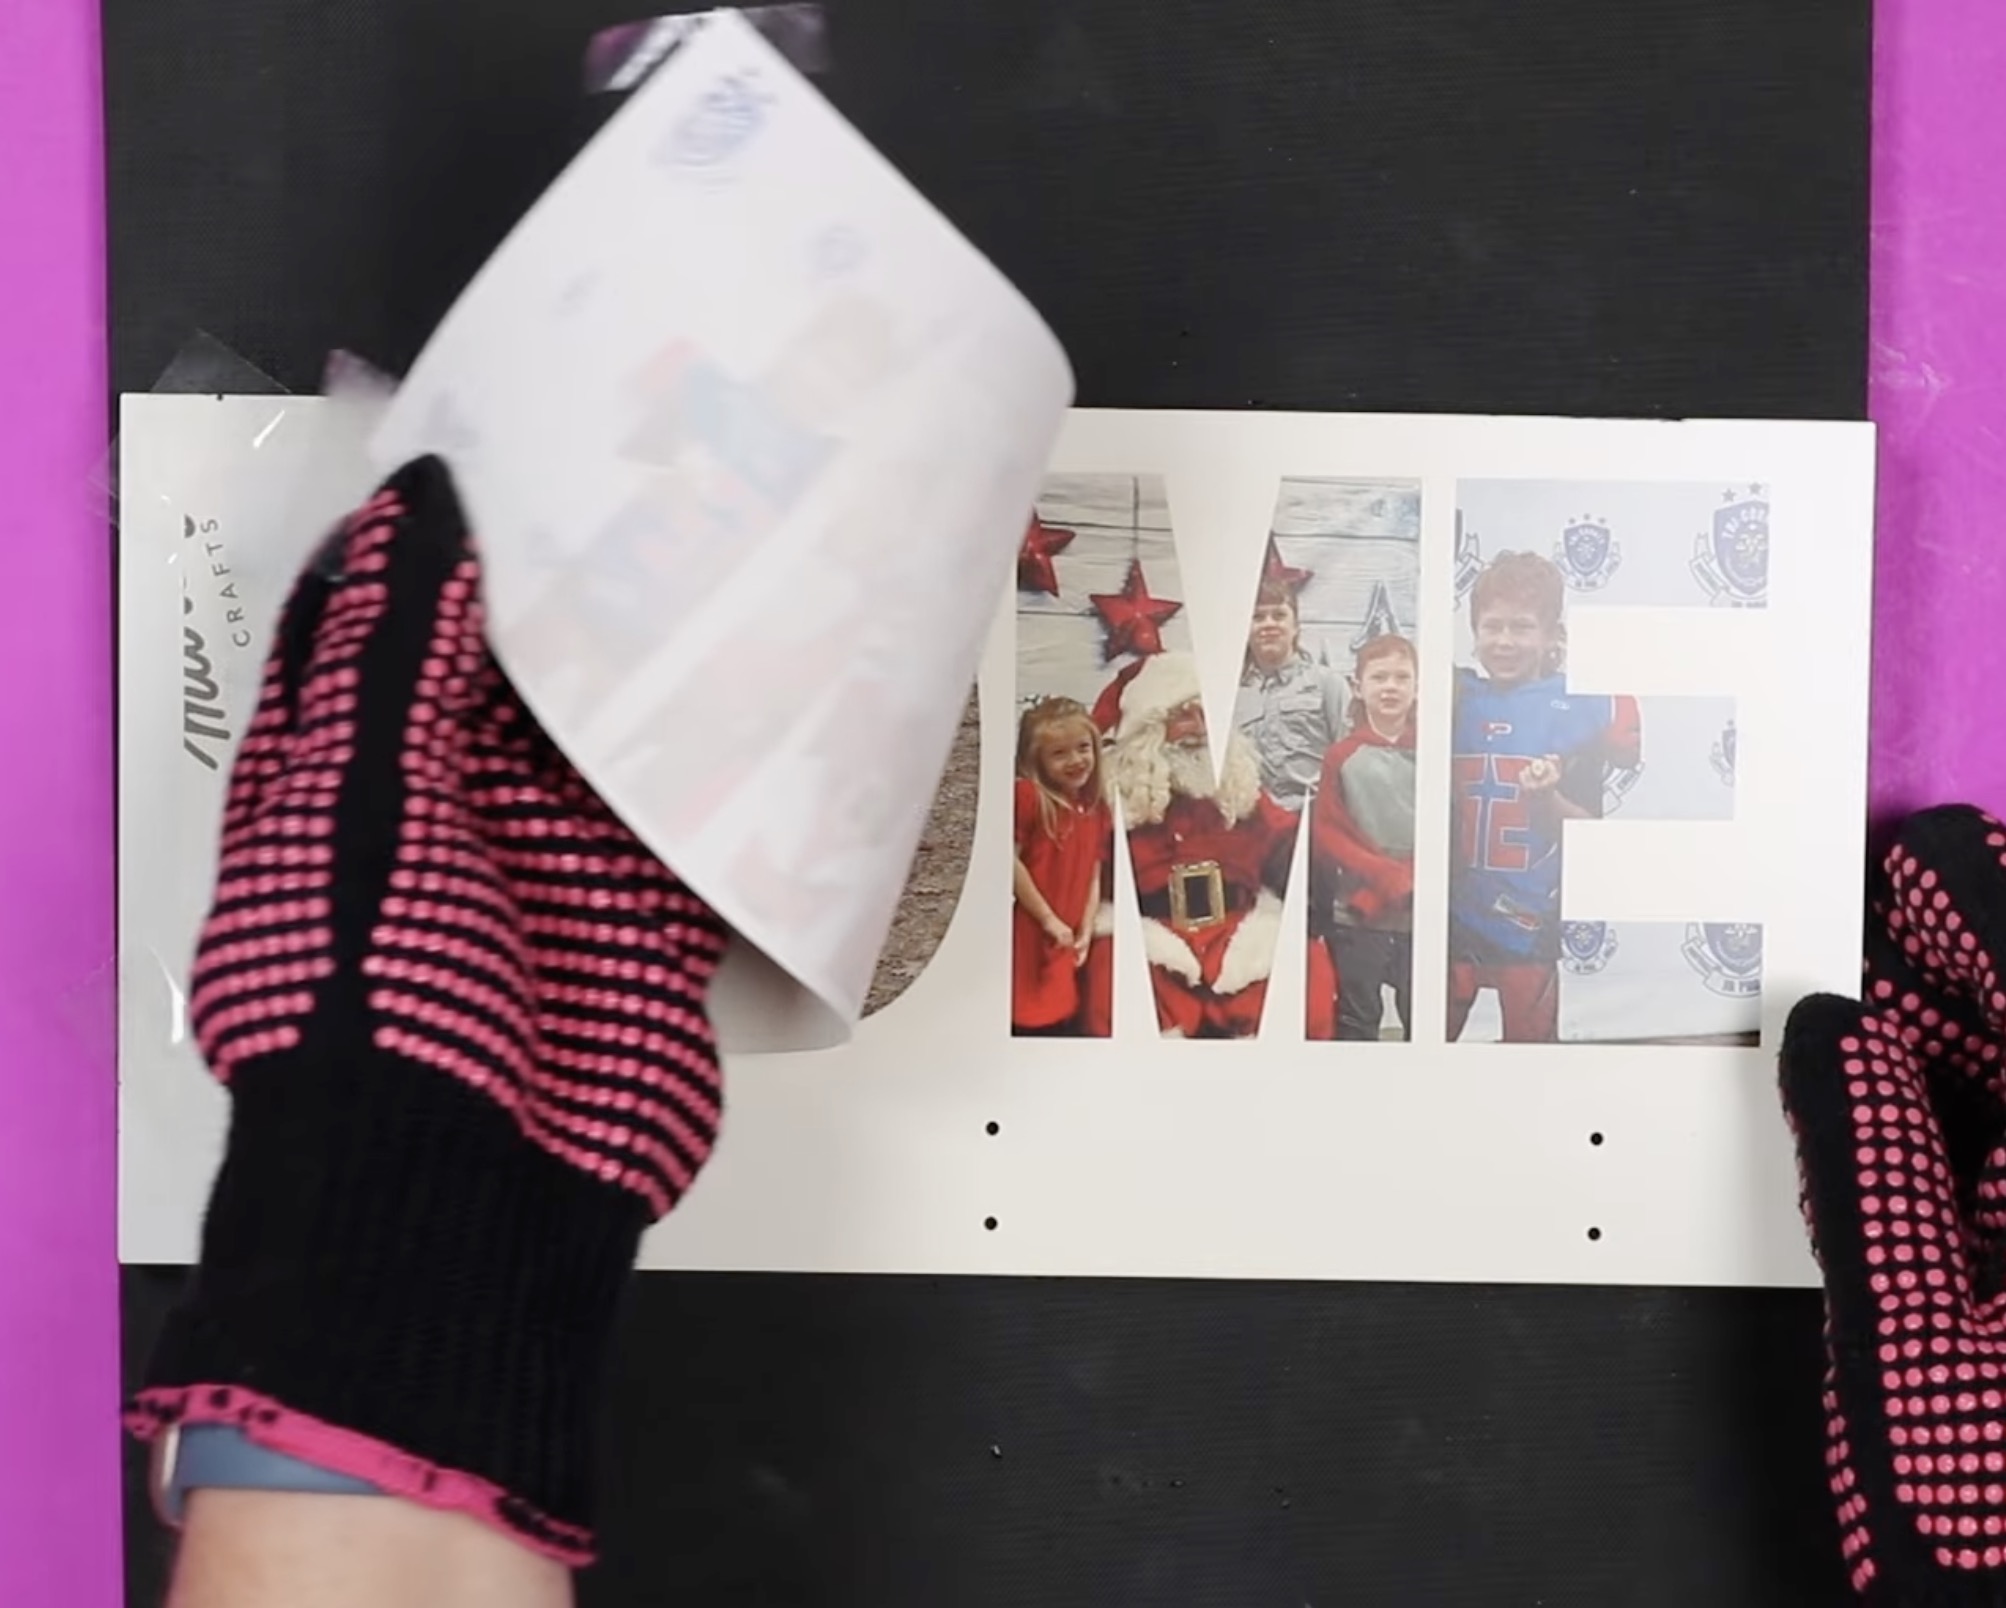
When the time is up, take away the EasyPress and place it to the facet. Your organizer might be very popular, so utilizing heat-resistant gloves, carry the nook of your print and verify that the design has transferred. Place the print again down and repeat the method for every nook.
Pin
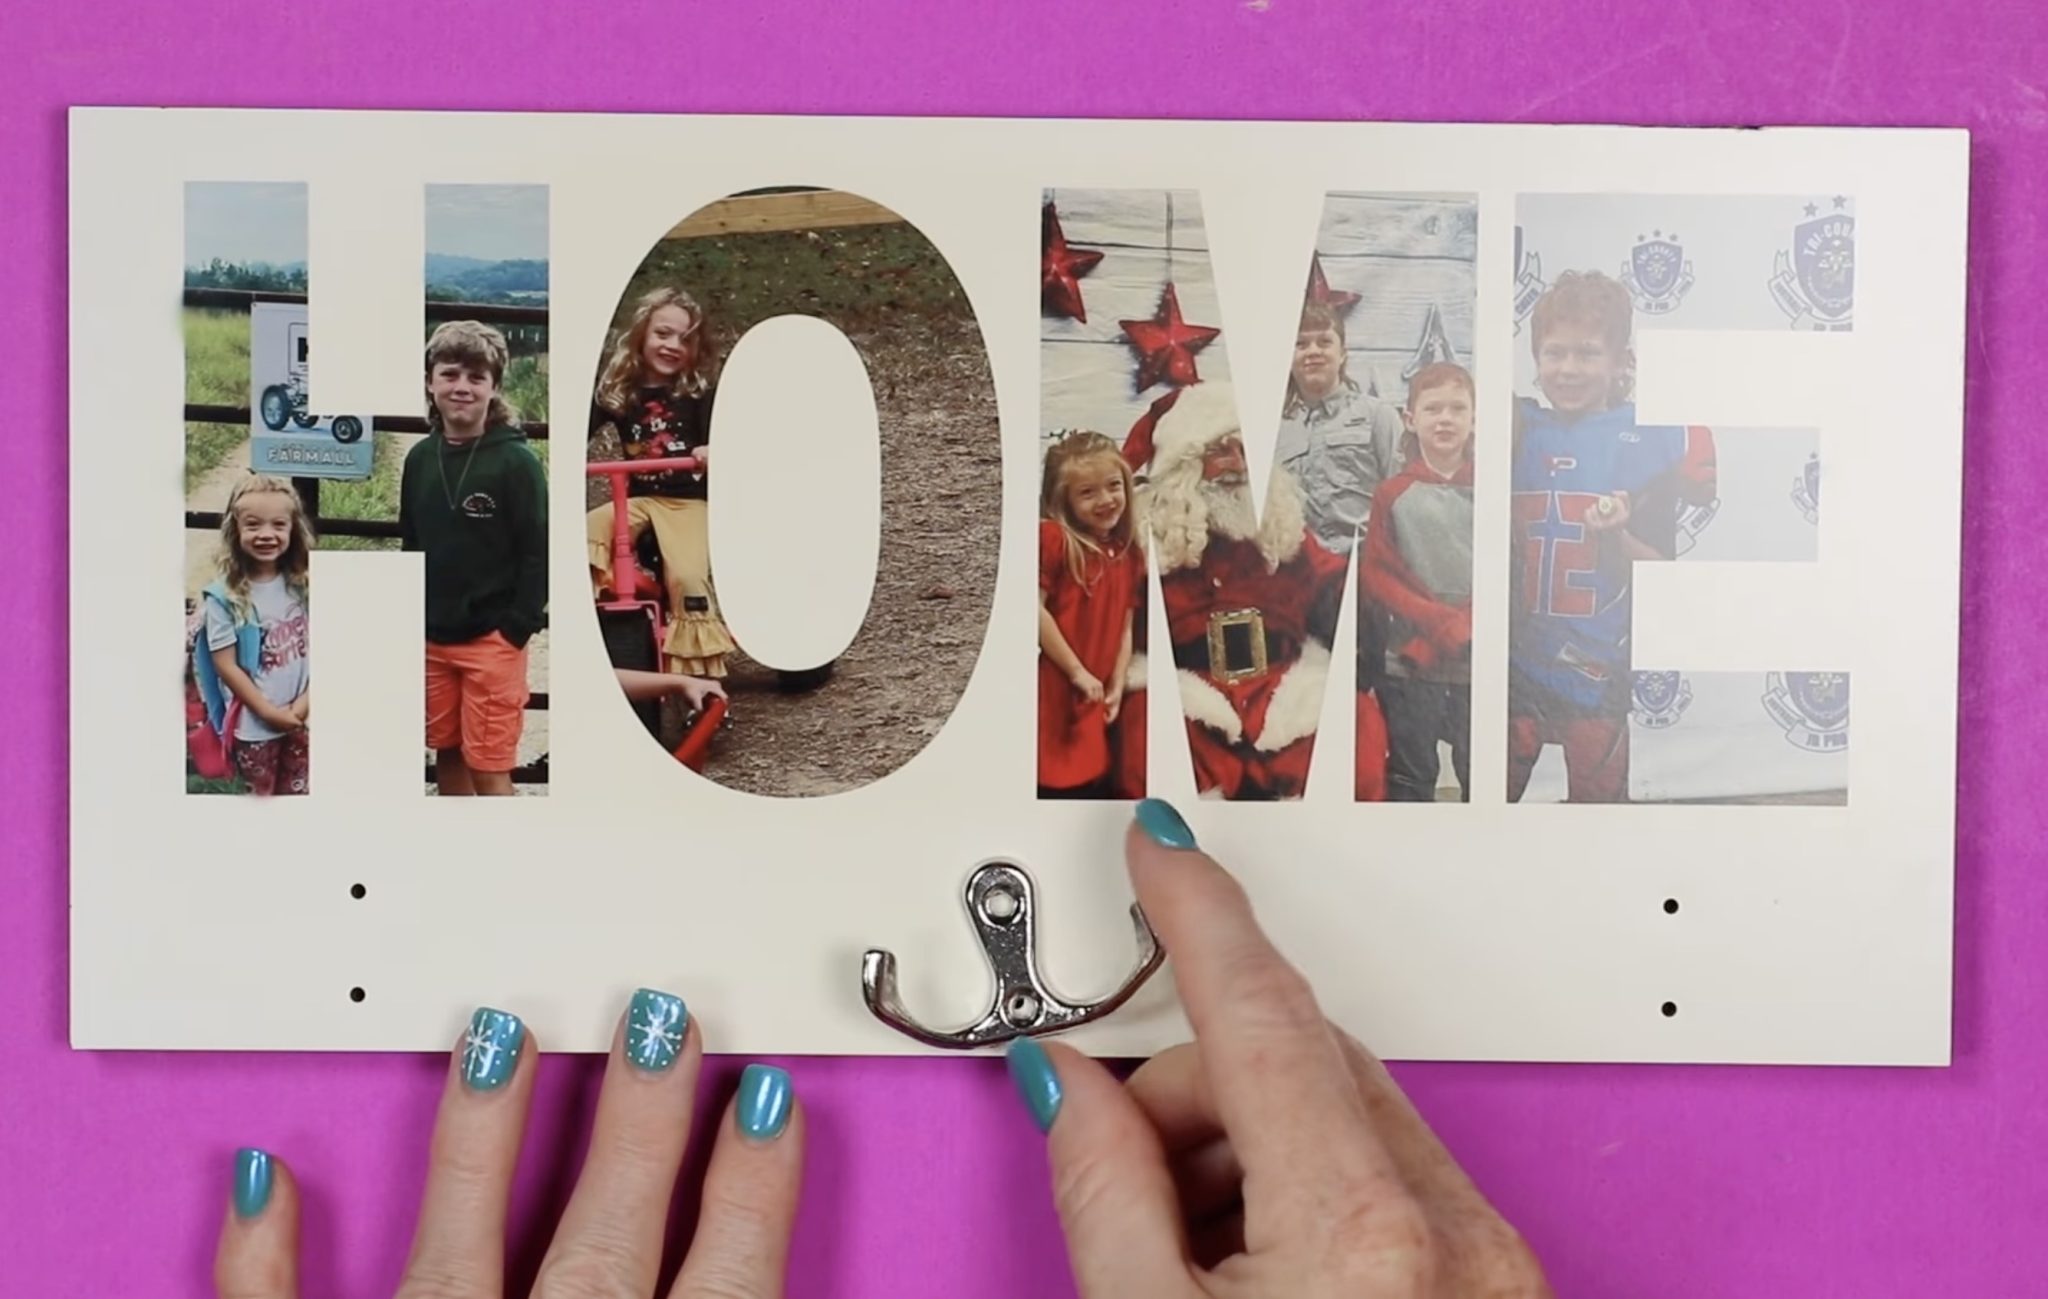
My design transferred fantastically with one press.
Pin
Virtually all the ink has transferred from the paper to the sublimation hanging organizer.
Pin
Take away the print after which flip the organizer over and place it underneath the heat-resistant mat, with one thing heavy on prime whereas it cools. This may stop the clean from warping whereas it cools.
Pin
Step 8. End Sublimation Hanging Organizer
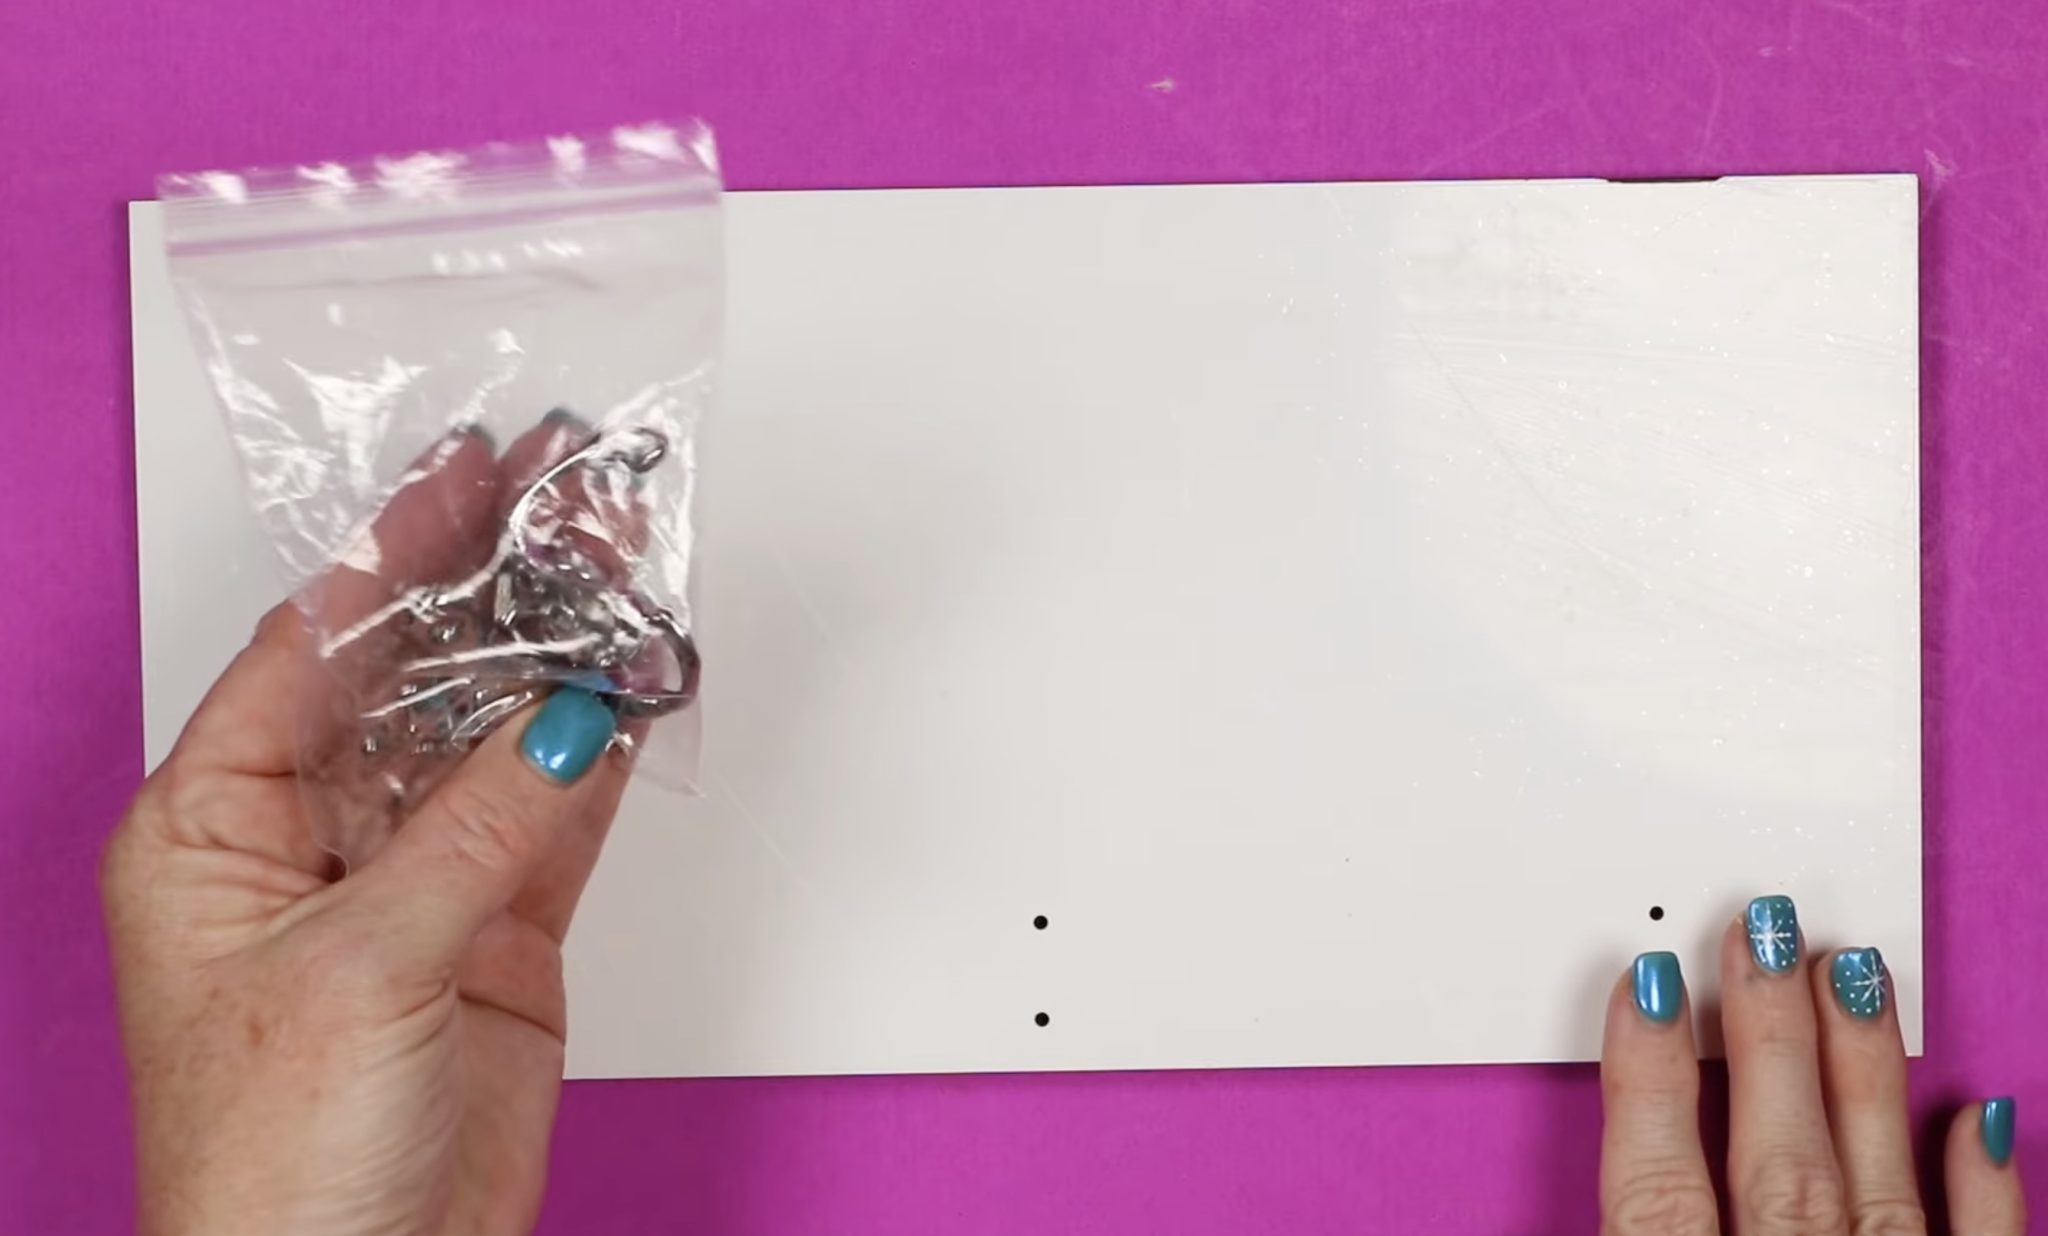
The one factor left to do at this level is to add the hooks.
There are holes pre-drilled for the hooks, and the hooks include screws. Safe the hooks utilizing a screwdriver, and your hanging organizer is completed.
Pin
Extra Concepts for a Sublimation Hanging Organizer
I’m loving how this undertaking turned out. It was so simple, even with the design course of.
Pin
Whereas I custom-made my organizer with the phrase House and pictures, you are able to do any design and phrase you need.
I’m enthusiastic about all of the other ways this can be utilized. I used to be considering it might even be cute in a kitchen for hanging aprons, decor items, or kitchen towels.
I did discover after I bought this organizer with these hooks that the stock was low. I linked to a few different choices within the provide listing above. In the event you select an possibility totally different from the one I used, make certain to verify the time and temperature suggestions.
All that is left for you to do is select the place you need to put your hanging sublimation organizer and the design you need to add to it.
I hope I’ve answered any questions you will have. In case you have any extra questions, depart them within the feedback, and I will be cheerful to reply them for you.
This put up and images could include Amazon or different affiliate hyperlinks. If you are going to buy one thing by means of any hyperlink, I'll obtai [...]
Snowman Meeting That is the place the snowman begins to come back to life. Stack your longest strips neatly, line up the ends, and punch a gap in ever [...]
Revealed: Mar 10, 2023 · Modified: Dec 3, 2025 by Shelly · This put up could comprise affiliate hyperlinks · 8 Feedback Let’s have fun the month of Ma [...]
Apply the Vinyl Decal Earlier than making use of the decal, clear the floor effectively. I like utilizing somewhat isopropyl alcohol as a result of it [...]
Make baked rooster fajitas in the oven for a easy, flavorful dinner that comes collectively rapid with minimal prep. Some days name for a dinner that [...]
This Never Fail Chocolate Fudge Recipe delivers clean, creamy, and chocolatey fudge- every- single- time. It’s the one fudge recipe you will ever want [...]
Searching for the right Christmas youngsters’ craft that makes use of Mod Podge? Discover ways to make a Christmas wreath with just some provides! Abi [...]
This white chocolate celebration combine recipe is a crowd-pleasing snack that works for events, presents, and film nights. This white chocolate celeb [...]
We use cookies on our website to give you the most relevant experience by remembering your preferences and repeat visits. By clicking “Accept”, you consent to the use of ALL the cookies.
This website uses cookies to improve your experience while you navigate through the website. Out of these, the cookies that are categorized as necessary are stored on your browser as they are essential for the working of basic functionalities of the website. We also use third-party cookies that help us analyze and understand how you use this website. These cookies will be stored in your browser only with your consent. You also have the option to opt-out of these cookies. But opting out of some of these cookies may affect your browsing experience.
Necessary cookies are absolutely essential for the website to function properly. These cookies ensure basic functionalities and security features of the website, anonymously.
Cookie
Duration
Description
cookielawinfo-checbox-analytics
11 months
This cookie is set by GDPR Cookie Consent plugin. The cookie is used to store the user consent for the cookies in the category "Analytics".
cookielawinfo-checbox-functional
11 months
The cookie is set by GDPR cookie consent to record the user consent for the cookies in the category "Functional".
cookielawinfo-checbox-others
11 months
This cookie is set by GDPR Cookie Consent plugin. The cookie is used to store the user consent for the cookies in the category "Other.
cookielawinfo-checkbox-necessary
11 months
This cookie is set by GDPR Cookie Consent plugin. The cookies is used to store the user consent for the cookies in the category "Necessary".
cookielawinfo-checkbox-performance
11 months
This cookie is set by GDPR Cookie Consent plugin. The cookie is used to store the user consent for the cookies in the category "Performance".
viewed_cookie_policy
11 months
The cookie is set by the GDPR Cookie Consent plugin and is used to store whether or not user has consented to the use of cookies. It does not store any personal data.
Functional cookies help to perform certain functionalities like sharing the content of the website on social media platforms, collect feedbacks, and other third-party features.
Performance cookies are used to understand and analyze the key performance indexes of the website which helps in delivering a better user experience for the visitors.
Analytical cookies are used to understand how visitors interact with the website. These cookies help provide information on metrics the number of visitors, bounce rate, traffic source, etc.
Advertisement cookies are used to provide visitors with relevant ads and marketing campaigns. These cookies track visitors across websites and collect information to provide customized ads.