Mak DIY spooky candle holders utilizing thrifted jars, Mod Podge, and classic photographs. Fast, effortless, and ideal for social gathering decor or your Halloween mantle!
Expertise Required: Newbie. It is best to have expertise with decoupage if you wish to do this mission – particularly to forestall wrinkles in the printed photographs.
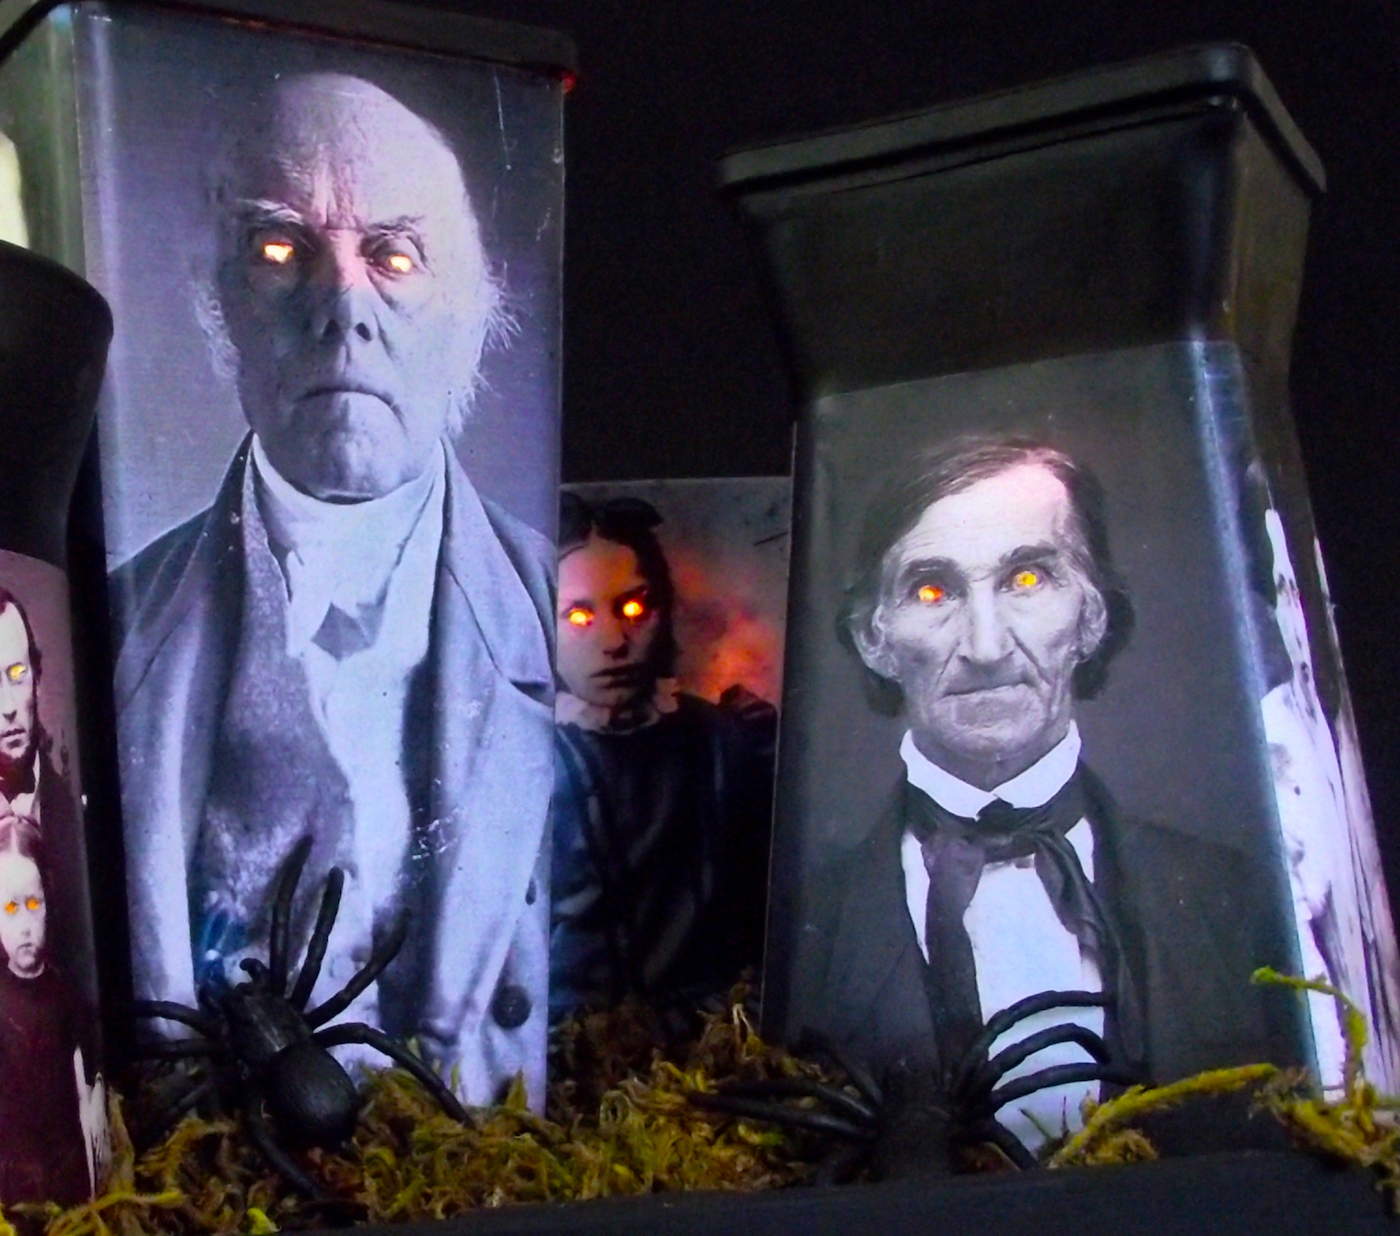
I don’t find out about you, however after I assume Halloween social gathering, I feel moody lighting. Give me flickering candles, spooky shadows, and only a trace of creepy glow and I’m all in.
So after I all of a sudden discovered myself internet hosting an impromptu Halloween get-together (why can we agree to those issues so rapid?), I knew I wanted a fast centerpiece – and rapid.
That’s how these DIY spooky candle holders got here to life.
I hit up the thrift retailer with no actual plan, and ended up grabbing a number of mismatched glass vases for lower than a greenback every. I didn’t know precisely what I used to be going to do with them till I remembered an outdated trick utilizing Mod Podge and classic photographs.
Add a little bit spray paint, poke out some creepy glowing eyes (sorry, Victorians), and growth . . . on the spot haunted vibe.
What I really like about these is how effortless they’re to personalize. You may make an entire set in a day, they usually look wonderful lined up on a desk, a mantle, and even tucked into a bookshelf.
And since they use electrical tealights, they’re protected to go away glowing all evening lengthy.
Should you want rapid Halloween decor with main spooky attraction, and also you don’t thoughts giving a number of vintage portraits a haunted makeover . . . this one’s for you.
Collect These Provides
- Glass jars or vases
- Classic photographs printed on laserjet
- An axe (I imagine that’s the official title – I are likely to name it “that pointy factor that I don’t know why I’ve or the place it got here from”). A toothpick, craft knife or something sharp would work
- Black spray paint
- Matte Mod Podge
- Electrical tea lights
- Scrap wooden
- Paintbrush
- Scissors
I did uncover that on a number of of them I wanted to raise my tealight only a bit to get the utmost glowing eye impact – a bit of wooden did the trick (painted black in fact).
Now I simply want a number of different issues, some temper lighting, meals . . . oh! and a dressing up. Then I’m great to go!
Get the printable the way to card for this Halloween craft for adults beneath:
Spooky Candle Holders
Learn to make candle holders utilizing spooky classic photographs and Mod Podge! Make these for a Halloween mantle.
Prep Time45 minutes minutes
Lively Time2 hours hrs 45 minutes minutes
Dry Time2 hours hrs
Complete Time5 hours hrs 30 minutes minutes
Yield: 4 holders
Value: $15
Select 4 jars of various sizes and types. Wash with gentle cleaning soap and water or rubbing alcohol and let dry.
Spray paint every glass jar with a coat of black spray paint and let dry.
Select classic photographs to suit the containers and resize to suit. Print and reduce with the scissors to suit the vases.
Earlier than attaching the photographs to the vases, use the axe to poke out the eyes.
Use Mod Podge to connect the photographs to the candle holders. Unfold the Podge on the vase, a skinny layer on the again of the image, after which clean them collectively. Repeat till all holders are coated and let dry.
Use the axe to wash up the attention sockets on every picture, concurrently scratching the paint off beneath so the sunshine can shine by way of.
Apply a coat of Mod Podge to every container and let dry fully earlier than utilizing.
Step 3: A fast Google seek for “spooky Victorian photographs” shortly offered tons of prospects. I downloaded a great choice and resized them to suit my vases.
Then I printed them out with a laserjet printer so that they wouldn’t bleed when Mod Podged. This took some measuring and trimming, but it surely was fast work.
Step 4: My apologies to the Victorian individuals in these photographs for poking out their eyes. I’m certain you had been very good and it’s simply the lengthy publicity occasions and a definite lack of moisturizer that makes you look a bit scary nowadays.
Step 5: To maintain issues shifting, I did one aspect of every vase at a time. By the point I’d finished the fourth vase, the primary one was dry sufficient to do one other aspect with out risking messing up the half I’d already finished.
-
- Should you’re in a rush, persist with straight sided vases. I just like the tapered shapes I used, however trimming issues to suit slowed me down a bit.
- Glass vases are effortless due to the various dimensions and shapes, however you may use PVC pipe, cardboard tubes – just about something.
- I feel electrical lights are a should for this. Not as a result of it’s a lot of a hearth or warmth hazard simply since you don’t have to consider them because the night goes on.
- For optimum glowy eye impact, attempt to maintain all of the eyes on roughly the identical stage for every jar. I acquired fortunate and did it by chance. When you’ve got some pics the place the eyes are down low and a few the place they eyes are up excessive, they received’t glow evenly.
Have a fantastic Halloween, everybody! Let me know what you consider this concept in the feedback. I’d additionally love so that you can go to these different posts:
BOO Letters • Button Artwork • Cheesecloth Ghost • Coffin Tray • Adorning Wooden Cutouts • Ornamental Blocks • DIY Wreath • Greenback Tree Wooden Pumpkin • Door Hangers • Mason Jar Lanterns • Mummy Luminaries • Paper Cones • Potion Bottles • Spooky Pumpkins • Wall Decor • Window Artwork • Witch Hat Garland